Your branded job board mostly runs itself. This guide shows you the handful of things you will actually do - and how little time each one takes.
1. Get started and find your way around
Log in
- Go to app.gospacewalk.com or directly to your board's web address (your personalised link, ending in .app.gospacewalk.com).
- Sign in with your email. You land on your board's home page.
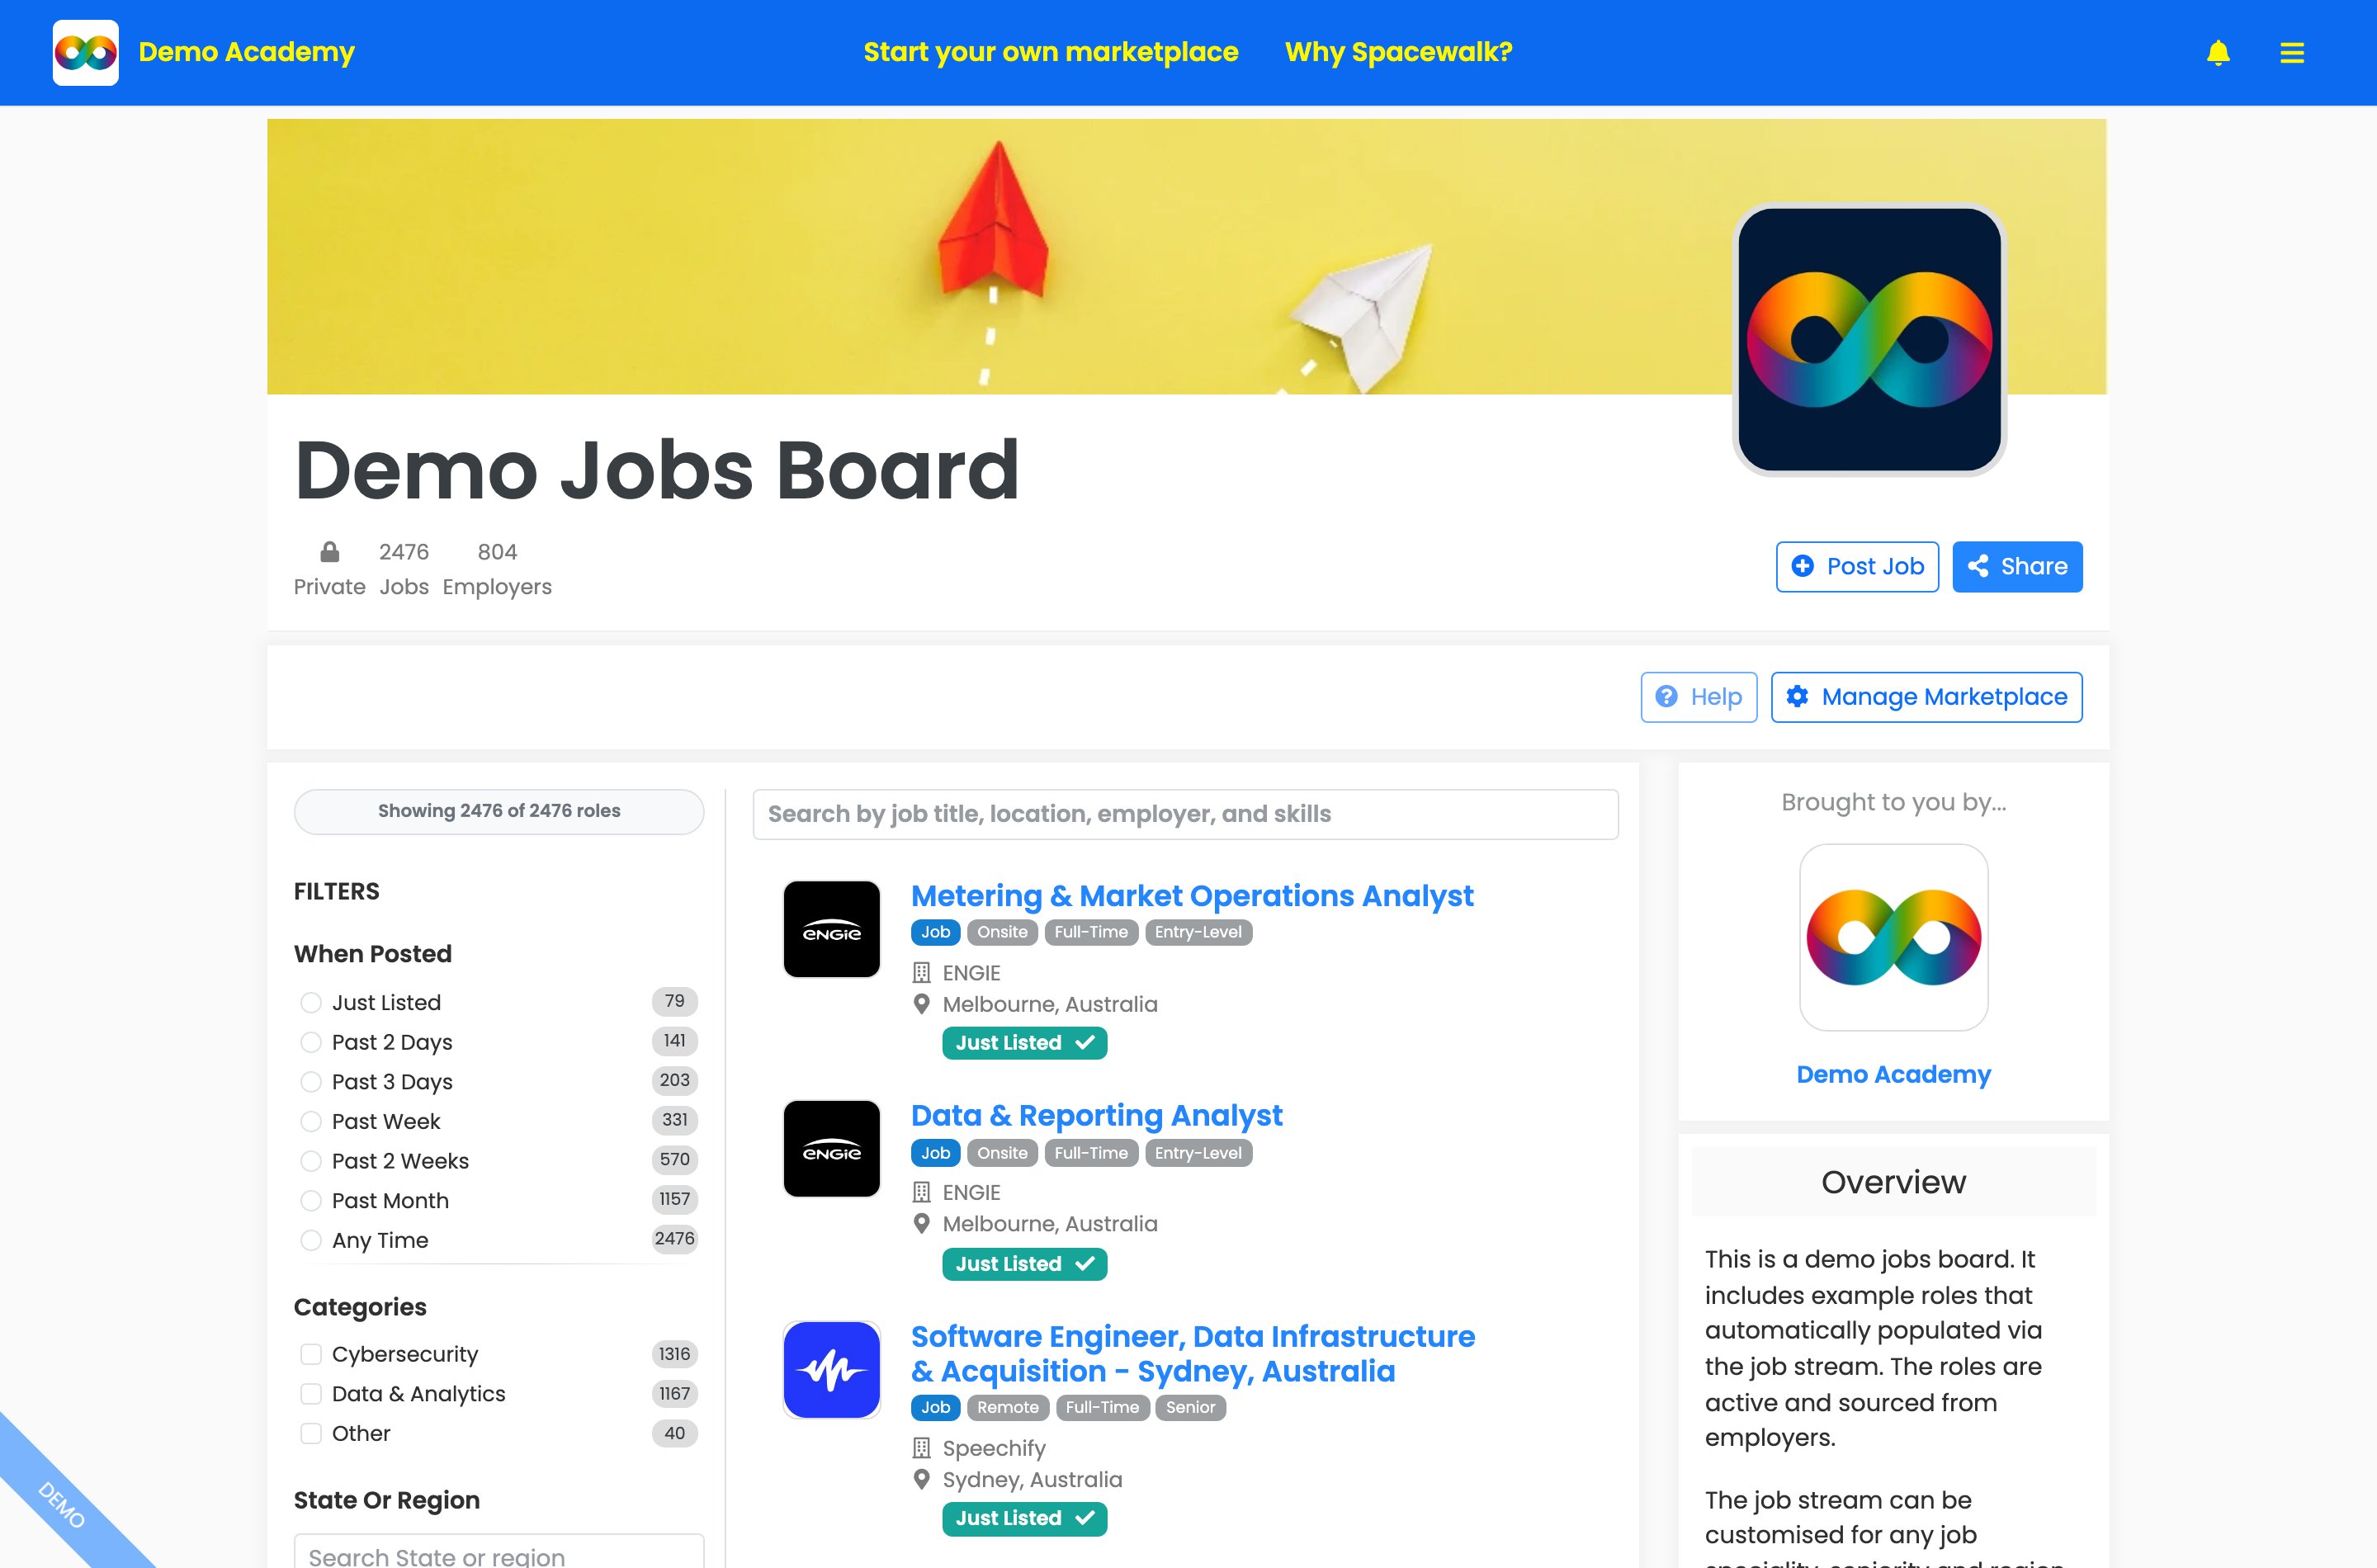
Your board home - branded header bar, board name, the "Private" badge and your "Jobs" and "Employers" counts, with "Post Job", "Share" and "Manage Marketplace".
The two places you'll work from
- Your board (the public view) - what your members see. From here you can post a role, "Share", open "Help" or jump into the controls with "Manage Marketplace".
- "Manage Marketplace" (the control room) - five tabs: "Overview", "Customisation", your members tabs (for example "Employers" and "Job seekers" - these follow your own terminology) and "Analytics".
The sidebar menu and notifications
- Press the menu icon (top right) to open the sidebar. Your most-used places are grouped here: "Tips and reminders" (suggestions such as adding an announcement card), "Manage" ("Company", "Marketplaces" and "Roles"), "Manage marketplaces" (one-click links to each of your boards' control rooms) and "Account" ("Profile", "Notification Settings" and "Sign out").
- Press the bell icon to open the "Notifications" sidebar - updates and alerts are grouped here, and when there's nothing to do it simply says "Nothing needs your attention."
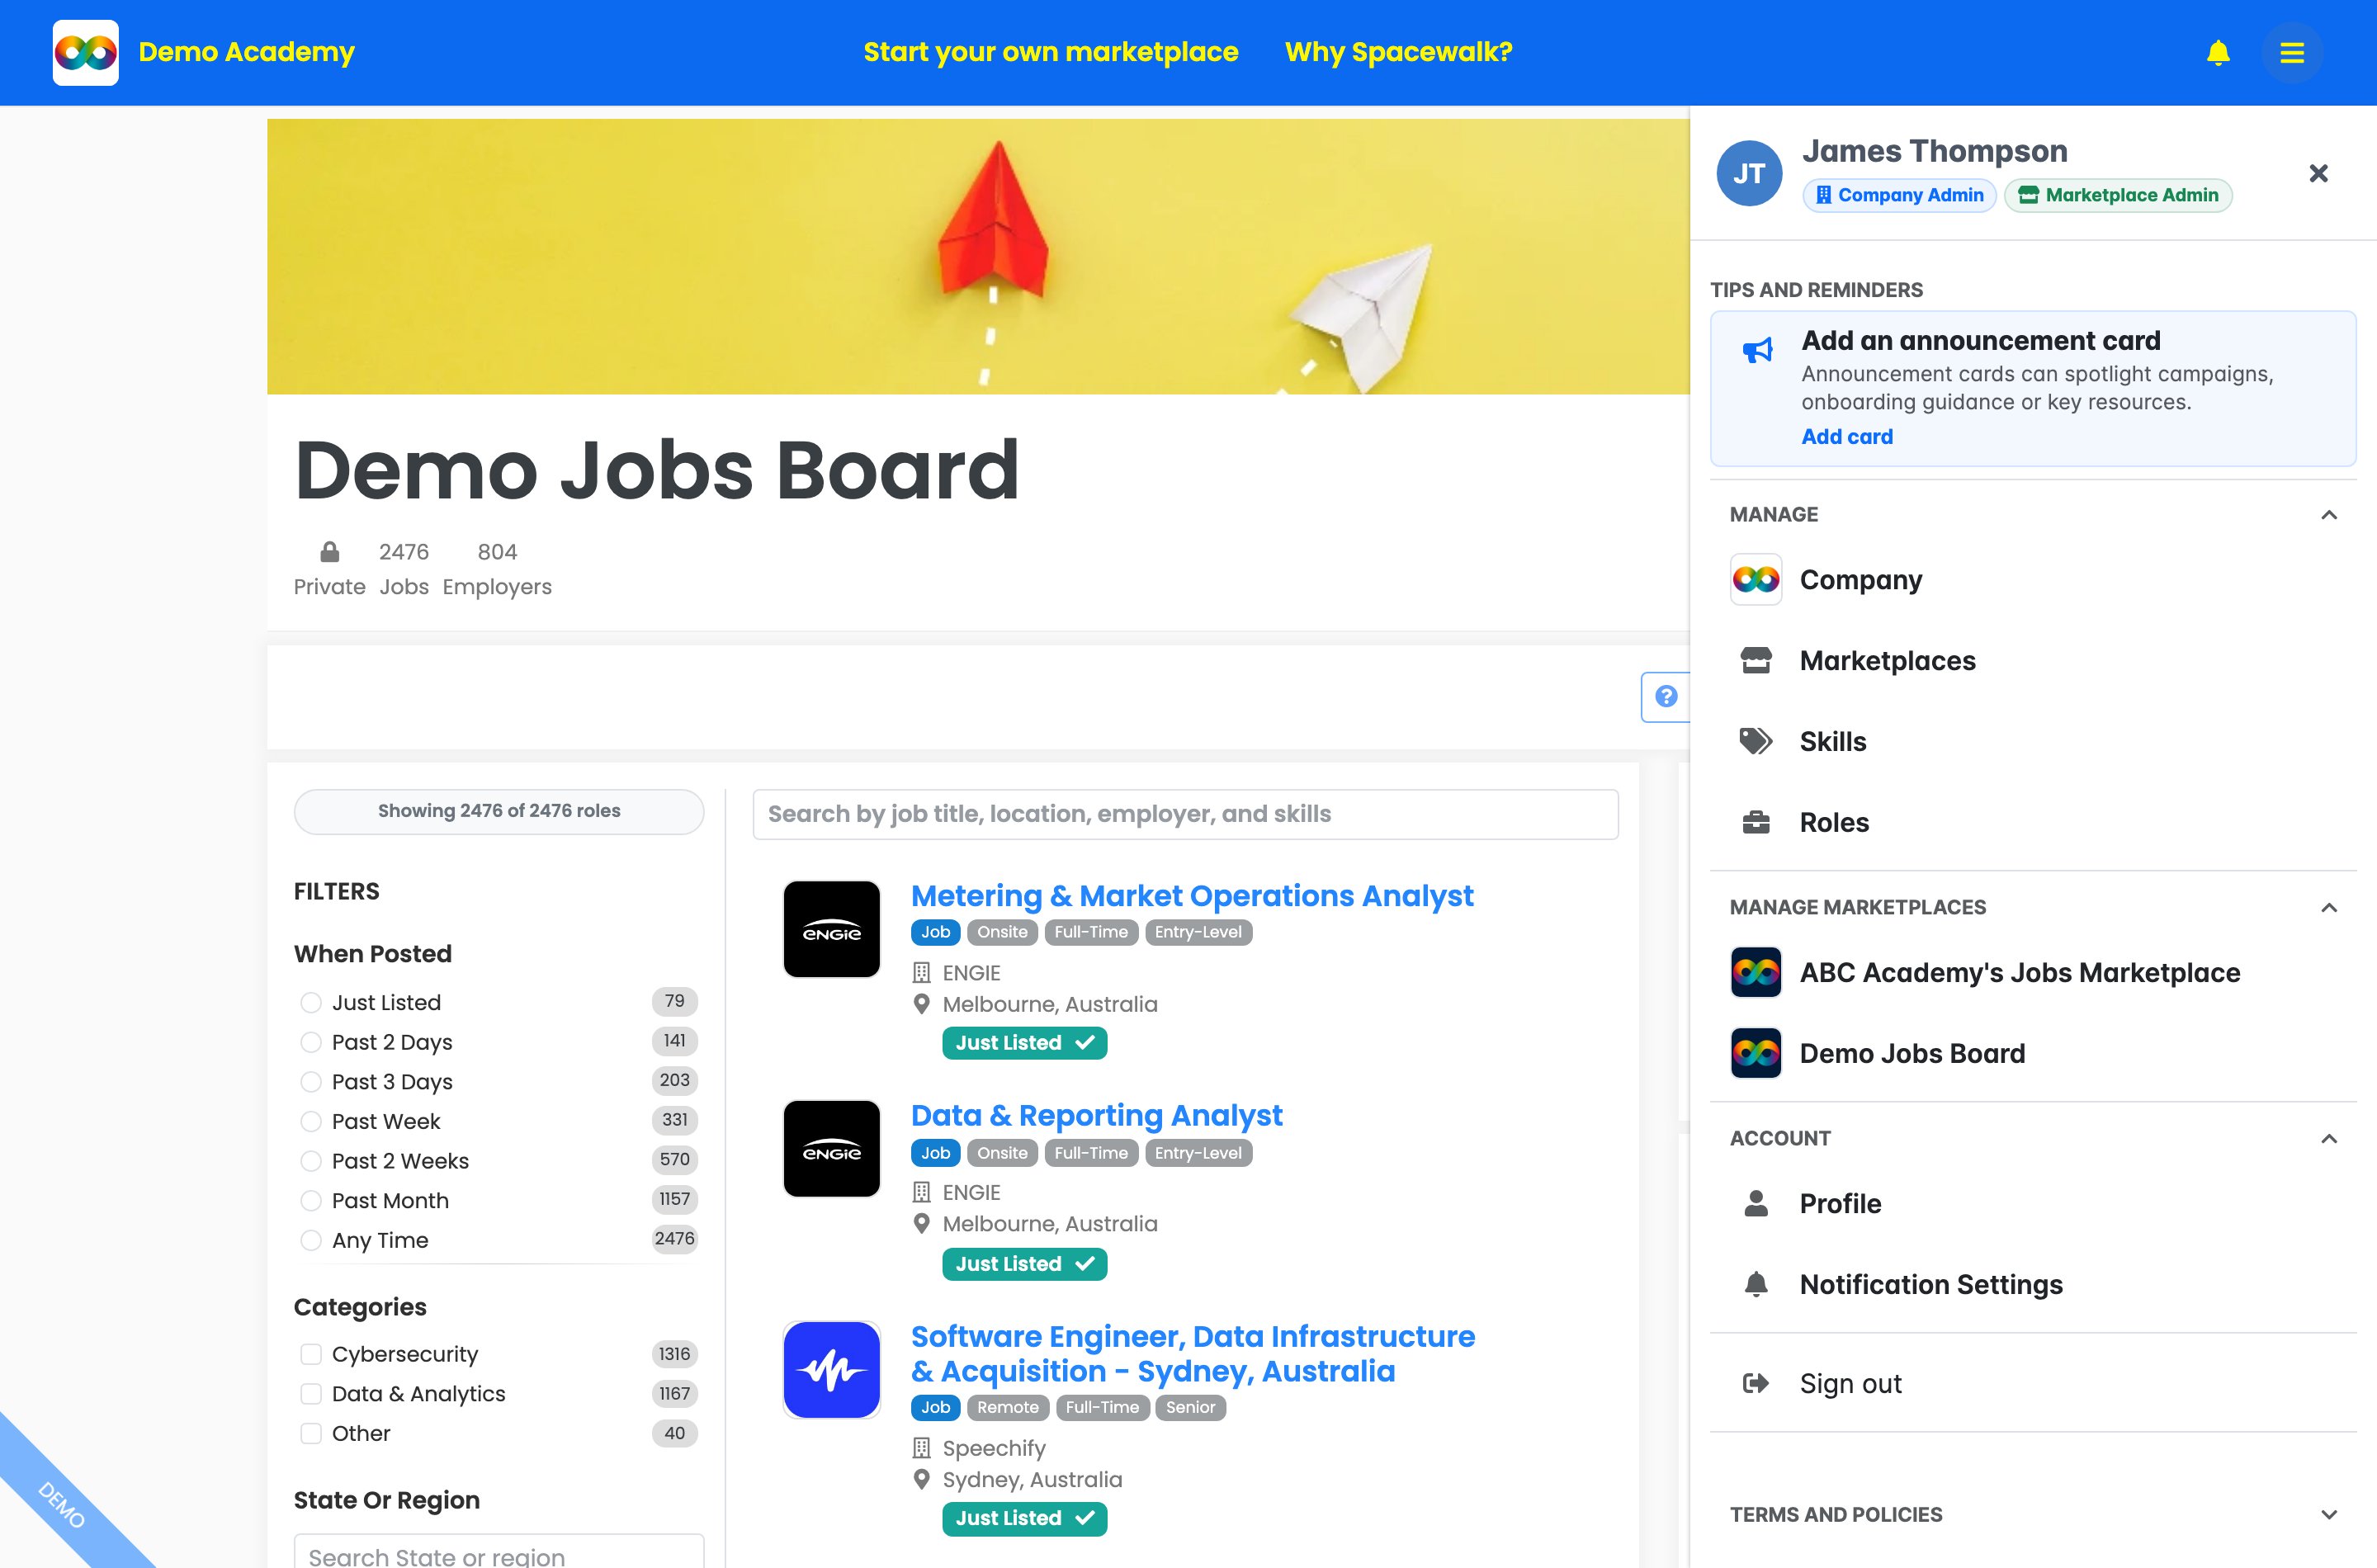
The sidebar: your name and role badges, "Tips and reminders" and the "Manage", "Manage marketplaces" and "Account" groups.
2. Keep the board full of fresh, relevant jobs
Your automatic job stream (we set this up for you)
The job stream is the feed of fresh, relevant roles that flows onto your board automatically. You don't build it yourself in the app. You tell us the kind of roles you want - things like job titles, skills, seniority and locations or regions - and we configure the stream for you. Roles are sourced directly from employers (not scraped from job-board aggregators), so they're real and current - and the stream can be customised for any job speciality, seniority and region, globally.
- Decide the criteria for the roles your members care about.
- Send those criteria to your Spacewalk contact (or ask us at "Help").
- We set the stream live and new matching roles appear on your board on their own - marked "Just Listed" when they're brand new.
Members get better ways to find stream roles too: filters for "When Posted" (from "Just listed" to "Any time"), "Categories", "State Or Region", "Location", "Source" and more. To change what the stream brings in, just tell us the new criteria - there's nothing to reconfigure on your side.
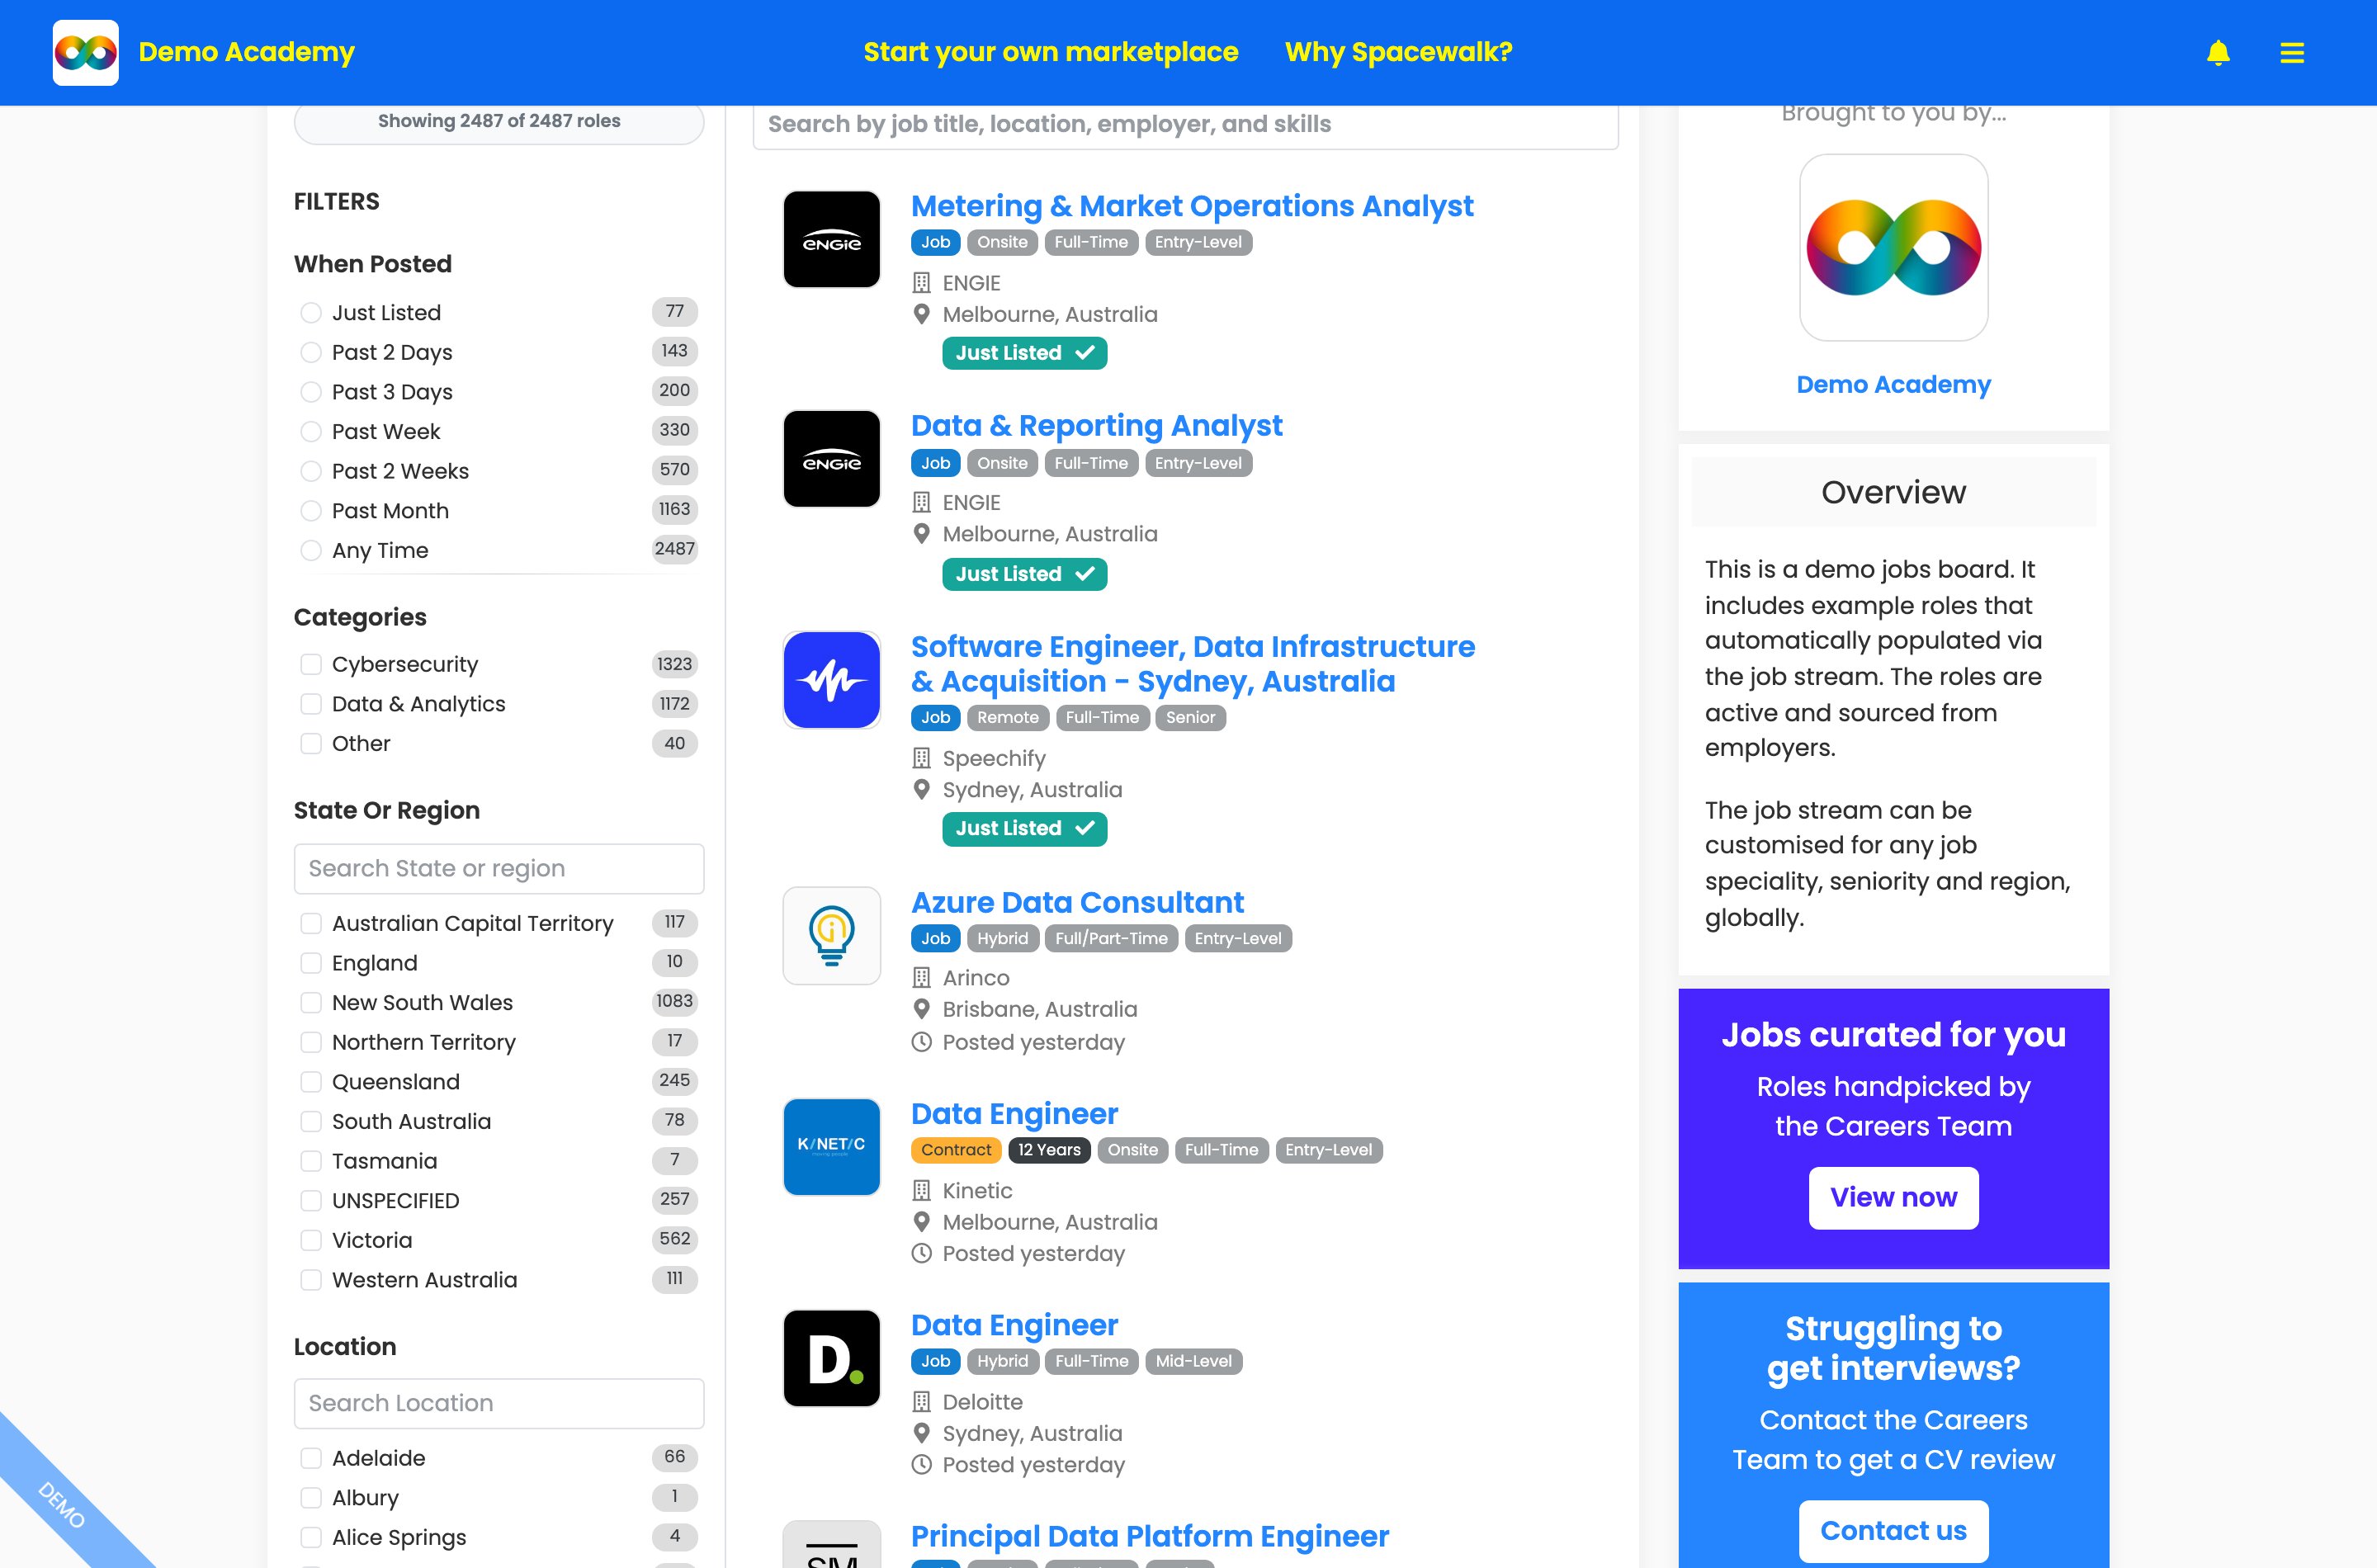
Job stream roles arrive on their own, tagged "Just Listed". Members filter by "When Posted", "Categories", "State Or Region" and more.
Keep members engaged automatically
- Go to "Manage Marketplace", then "Customisation", then "Settings".
- Under "Engagement", turn on the Weekly "Job Stream" Opportunities Email to keep members engaged with weekly role matches by email.
- Press "Save".
Add a single role yourself, in seconds, with the AI importer
When you want to add one specific role, you don't have to type it all out. Paste a link or the text and Spacewalk fills in the details for you.
- On your board, press the post button (labelled "Post Job" or "Post Opportunity", following your terminology).
- Under "Import external role", choose "From URL" and paste the job posting's web address, then press "Import". (Or choose "From Text", paste the job description and press "Extract".)
- Check the details it filled in - role title, description, skills, country, location, type, work environment, hours and experience level.
- Under "Who is this role for?", confirm the employer applicants will see on the role (your own company is selected by default; press "Change employer" to pick or add another - see below).
- Under "Display opportunity on..." tick the board(s) where it should appear.
- Set how people apply under "Application method": "Receive applications on Spacewalk" or "Redirect to an external application form / ATS" (then paste your "ATS URL").
- Press "Publish" (or "Save as Draft" to finish later).
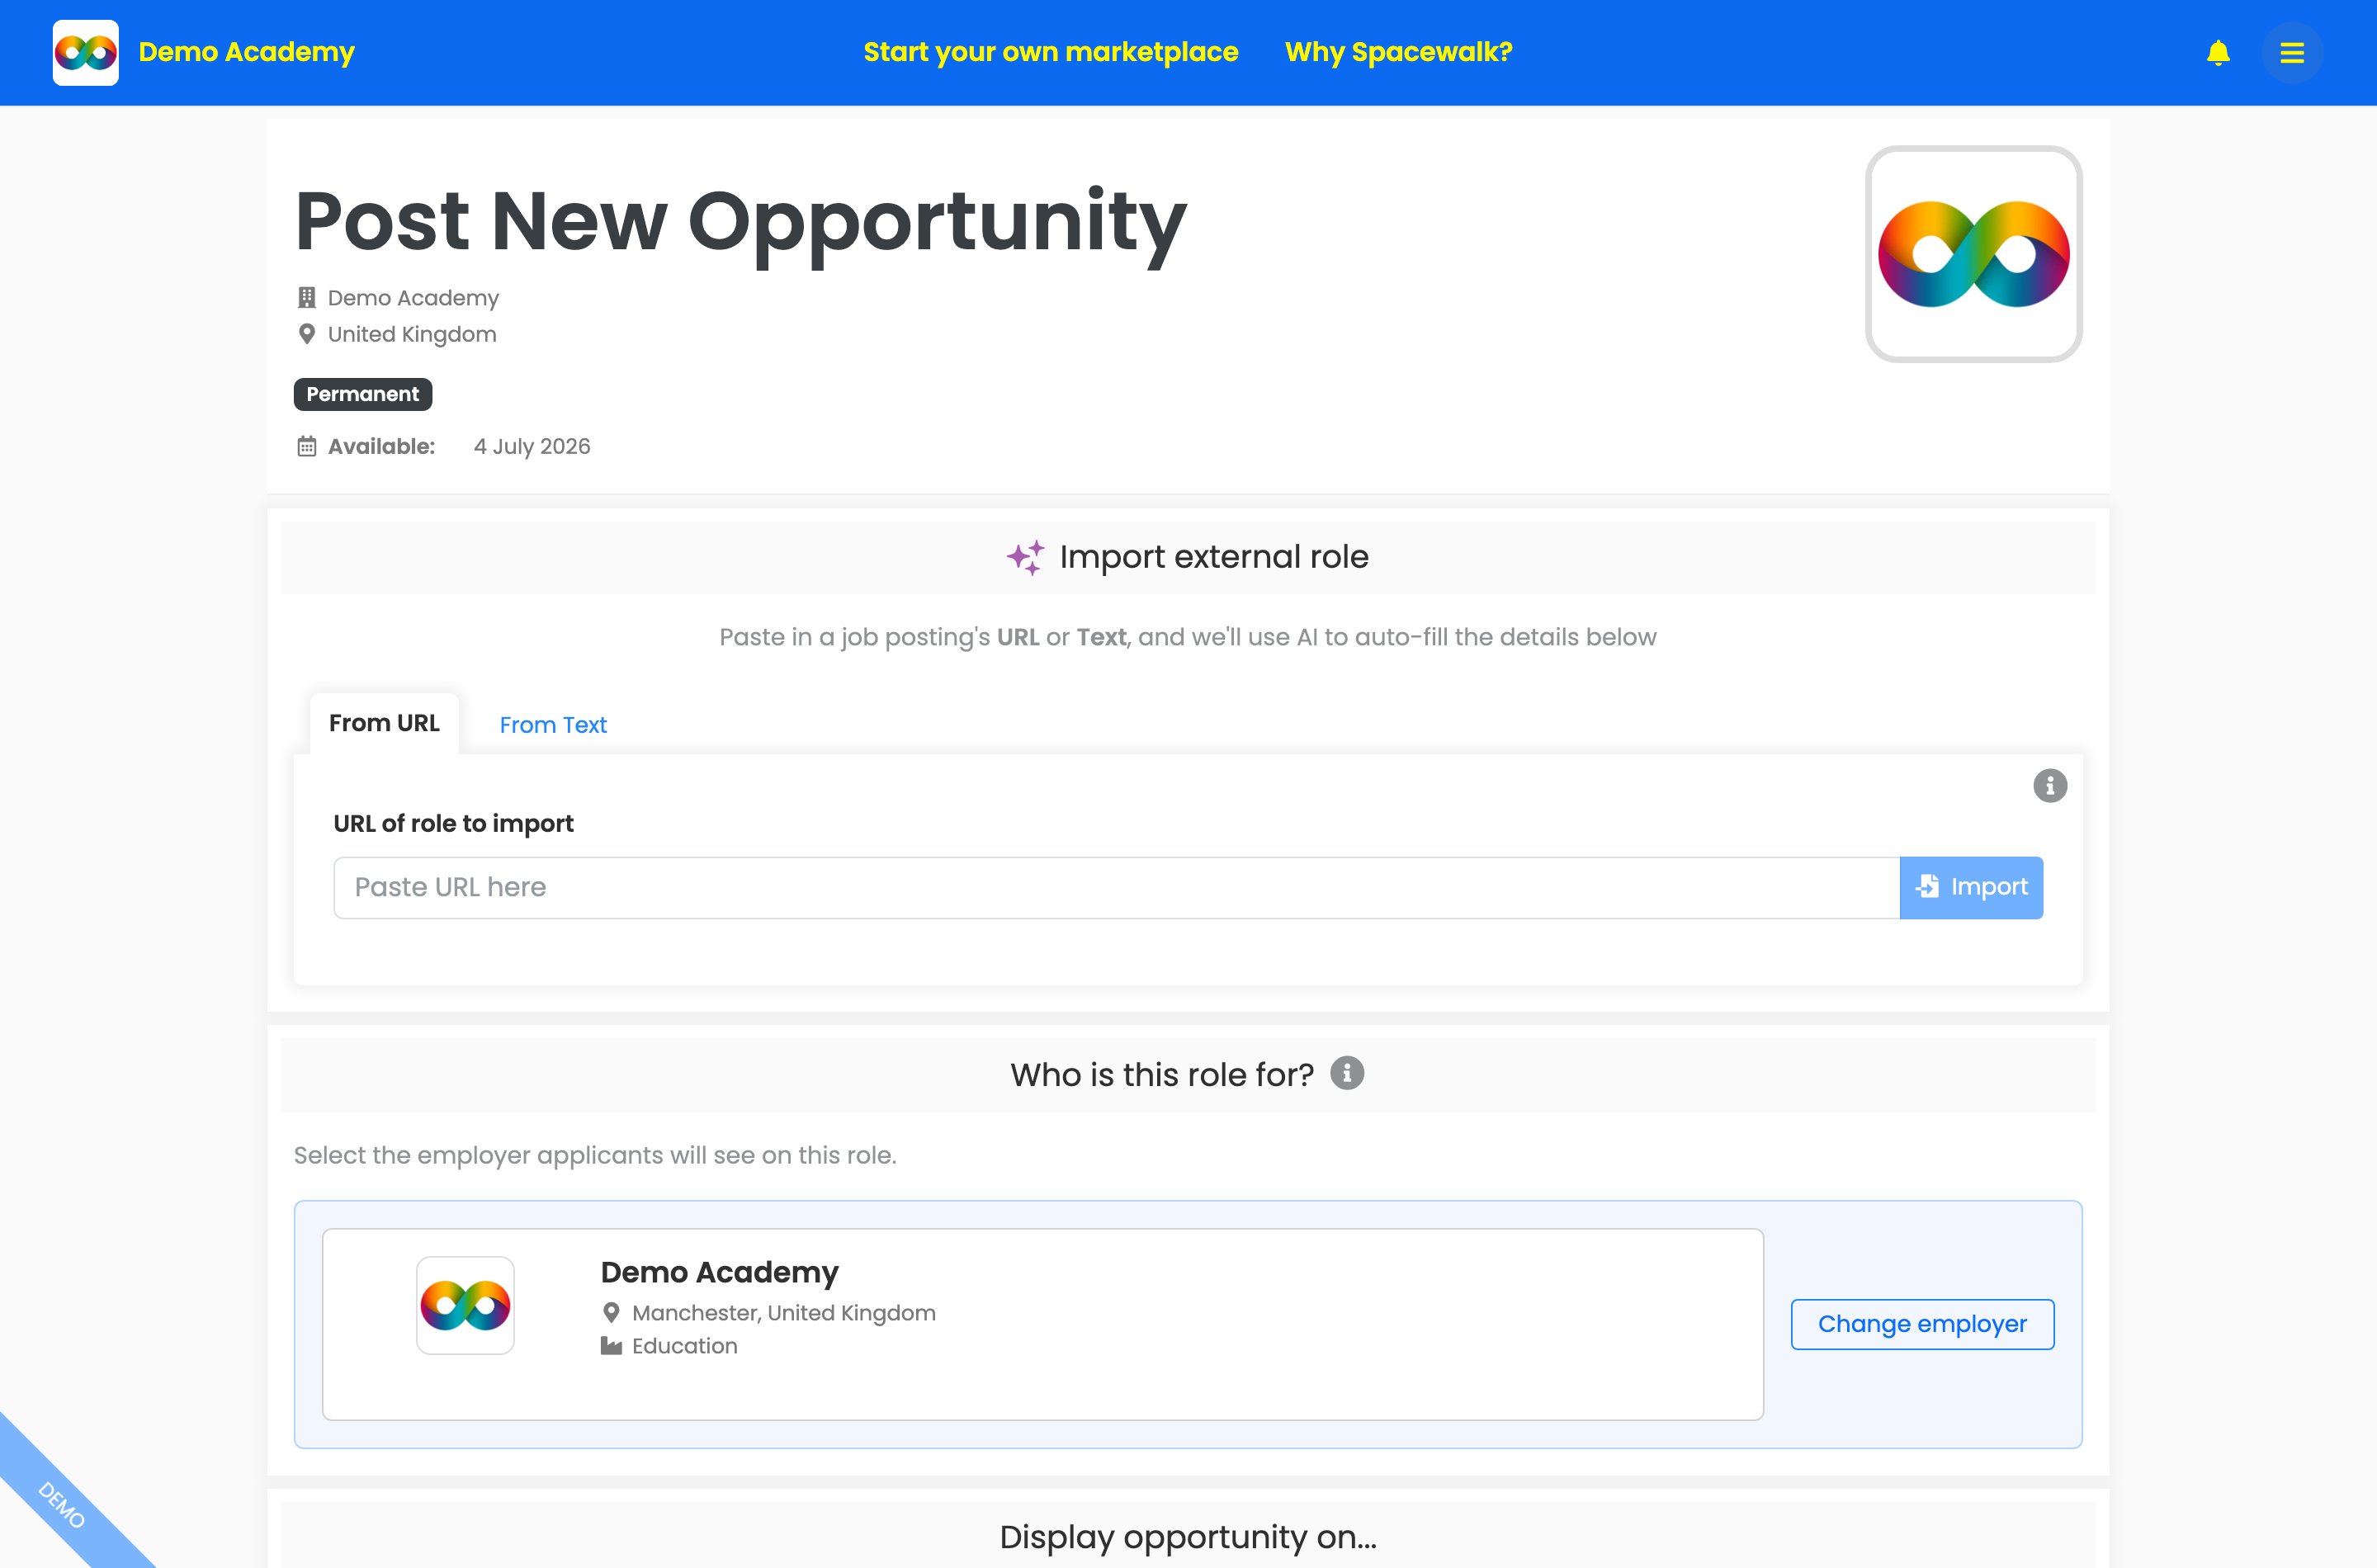
"Post New Opportunity" - paste a link under "Import external role" ("From URL" or "From Text"), press "Import", then confirm the employer under "Who is this role for?".
Pay, budgets and locations on a role
- Budget - set a "Budget status": "Specified amount", "Negotiable", "Unpaid" or "Not specified". For a specified amount, choose a "Payment basis" ("Time-based rate" or "Fixed fee"), the amount in any of 40+ currencies and a rate period ("Hour", "Day", "Week", "Month" or "Year"). Tick "Show budget on the role page" if you want candidates to see it in the role header.
- Expected duration - "Permanent", "Fixed term" (with a length and unit from hours to years) or "Not specified".
- More precise locations - as well as country and location, you can set a "State or region" (state, province, territory or region), so members can filter roles by region.
- Match notification audience - choose who is notified about the role: only people in the role country, people in the role country plus selected additional countries, or people in any country (useful for remote or relocation-friendly roles).
Manage the employer brands you post for
If you post roles on behalf of employer brands, they're managed in one place.
- Open the menu, then "Manage Company", then "Company", then "Employer profiles".
- Press "Add employer profile" to add a brand, or use the search box to find one; each row shows its location, industry and how many roles it has, with edit, duplicate and delete actions. You can also "Export" the list.
- When posting a role, press "Change employer" to search and "Select" the right profile - or add a new one on the spot.
Tidy the list
- Members can search and filter the board by when posted, category, state or region, location, source, type, experience level, work environment, hours, employer and skills - so even a big board stays easy to navigate.
- You can choose to hide closed roles automatically (see "Make the board look like yours" below).
3. Control who is in your community
Choose how people join
- Go to "Manage Marketplace", then "Customisation", then "Settings".
- Under "Marketplace access", pick one: "Public" (anyone can join without approval), "Private" (people join by your invitation or by an approved request) or "Invitation only" (people must be invited to join).
- Press "Save".
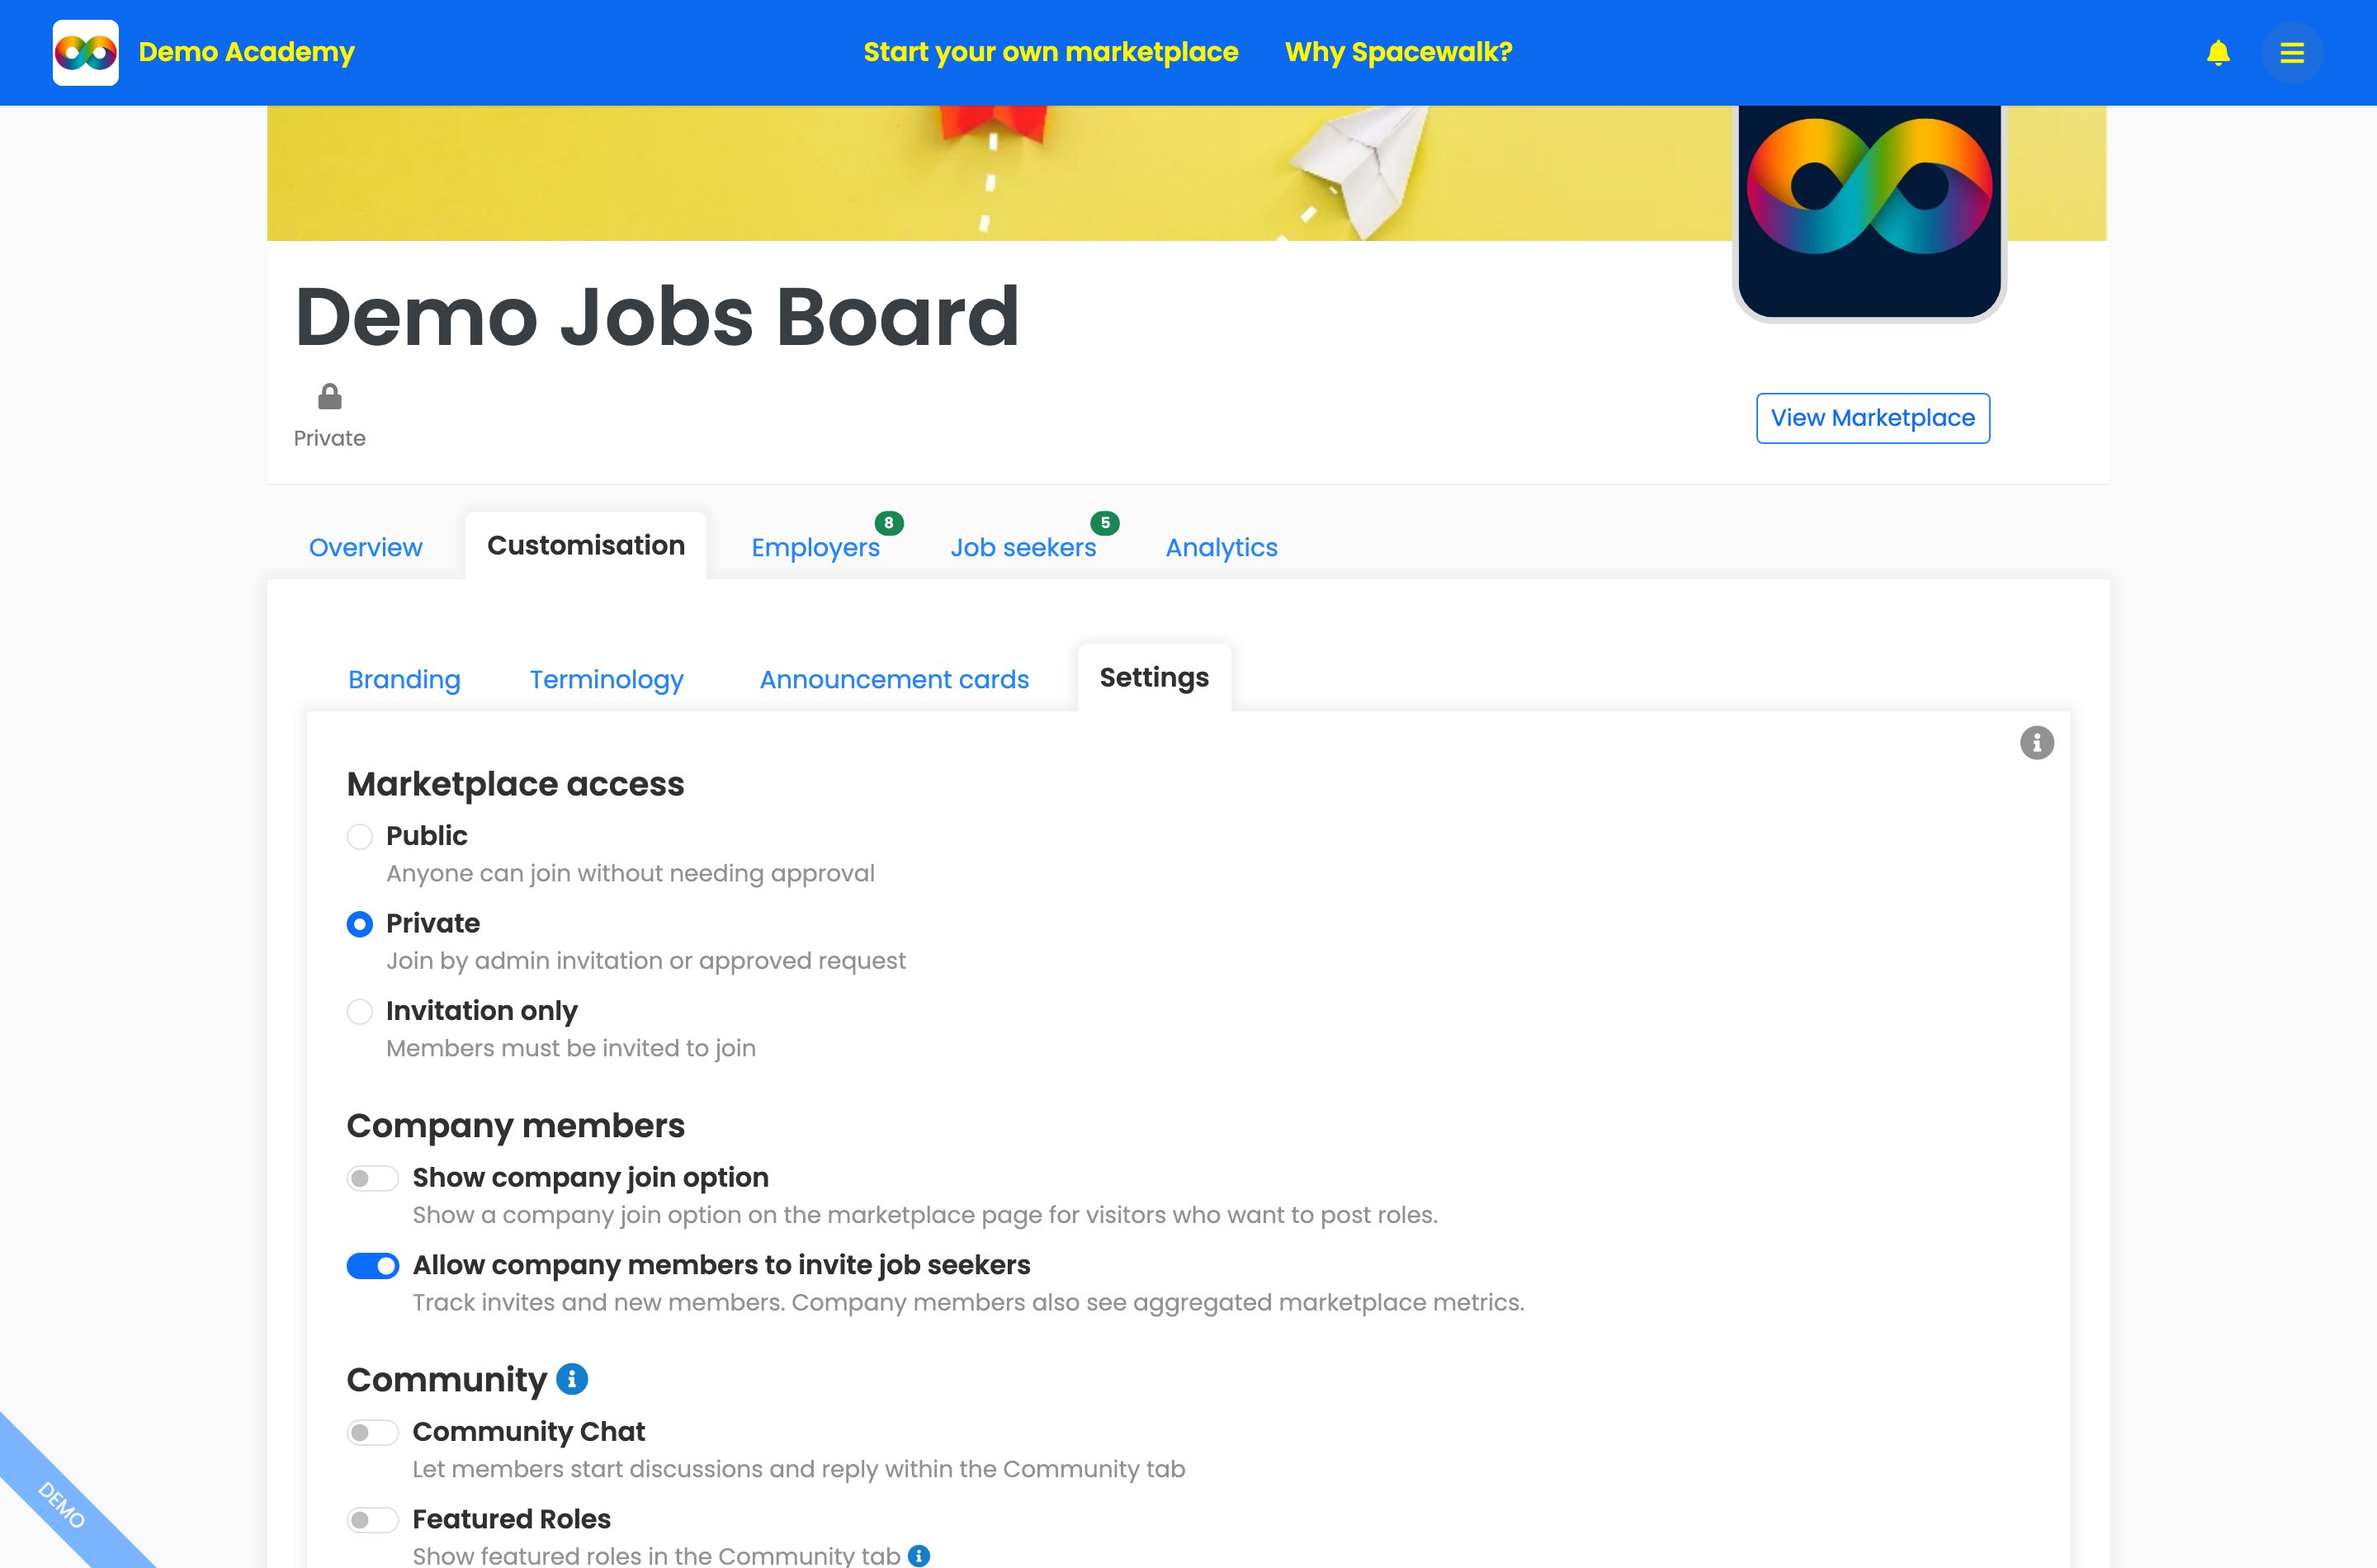
Customisation, then Settings: choose "Public", "Private" or "Invitation only", plus the company-member and community options below.
Invite your talent pool (one by one or all at once)
- Go to "Manage Marketplace", then your individual members tab (for example "Individuals" or "Job seekers"), then "Invites".
- For one person, use "Invite New Members": choose "External Individuals" (or "Internal Employees"), enter a "Name (optional)" and "Email" and press "Add to list".
- For your whole list, press "Paste a list" next to "Inviting several people?" and paste your people - one per line or several per line, in any mix of formats: an email on its own, "Priya Patel, priya@example.com", "Sam Rivera <sam@example.com>" or several comma-separated on one line.
- Press "Add valid people to list". Spacewalk checks your list for you: duplicates are merged and anything it can't recognise stays in the box with a clear message so you can correct or remove it, then try again.
- Review the "Ready to send" list - you can edit names and emails or remove people - then press "Send invitations".
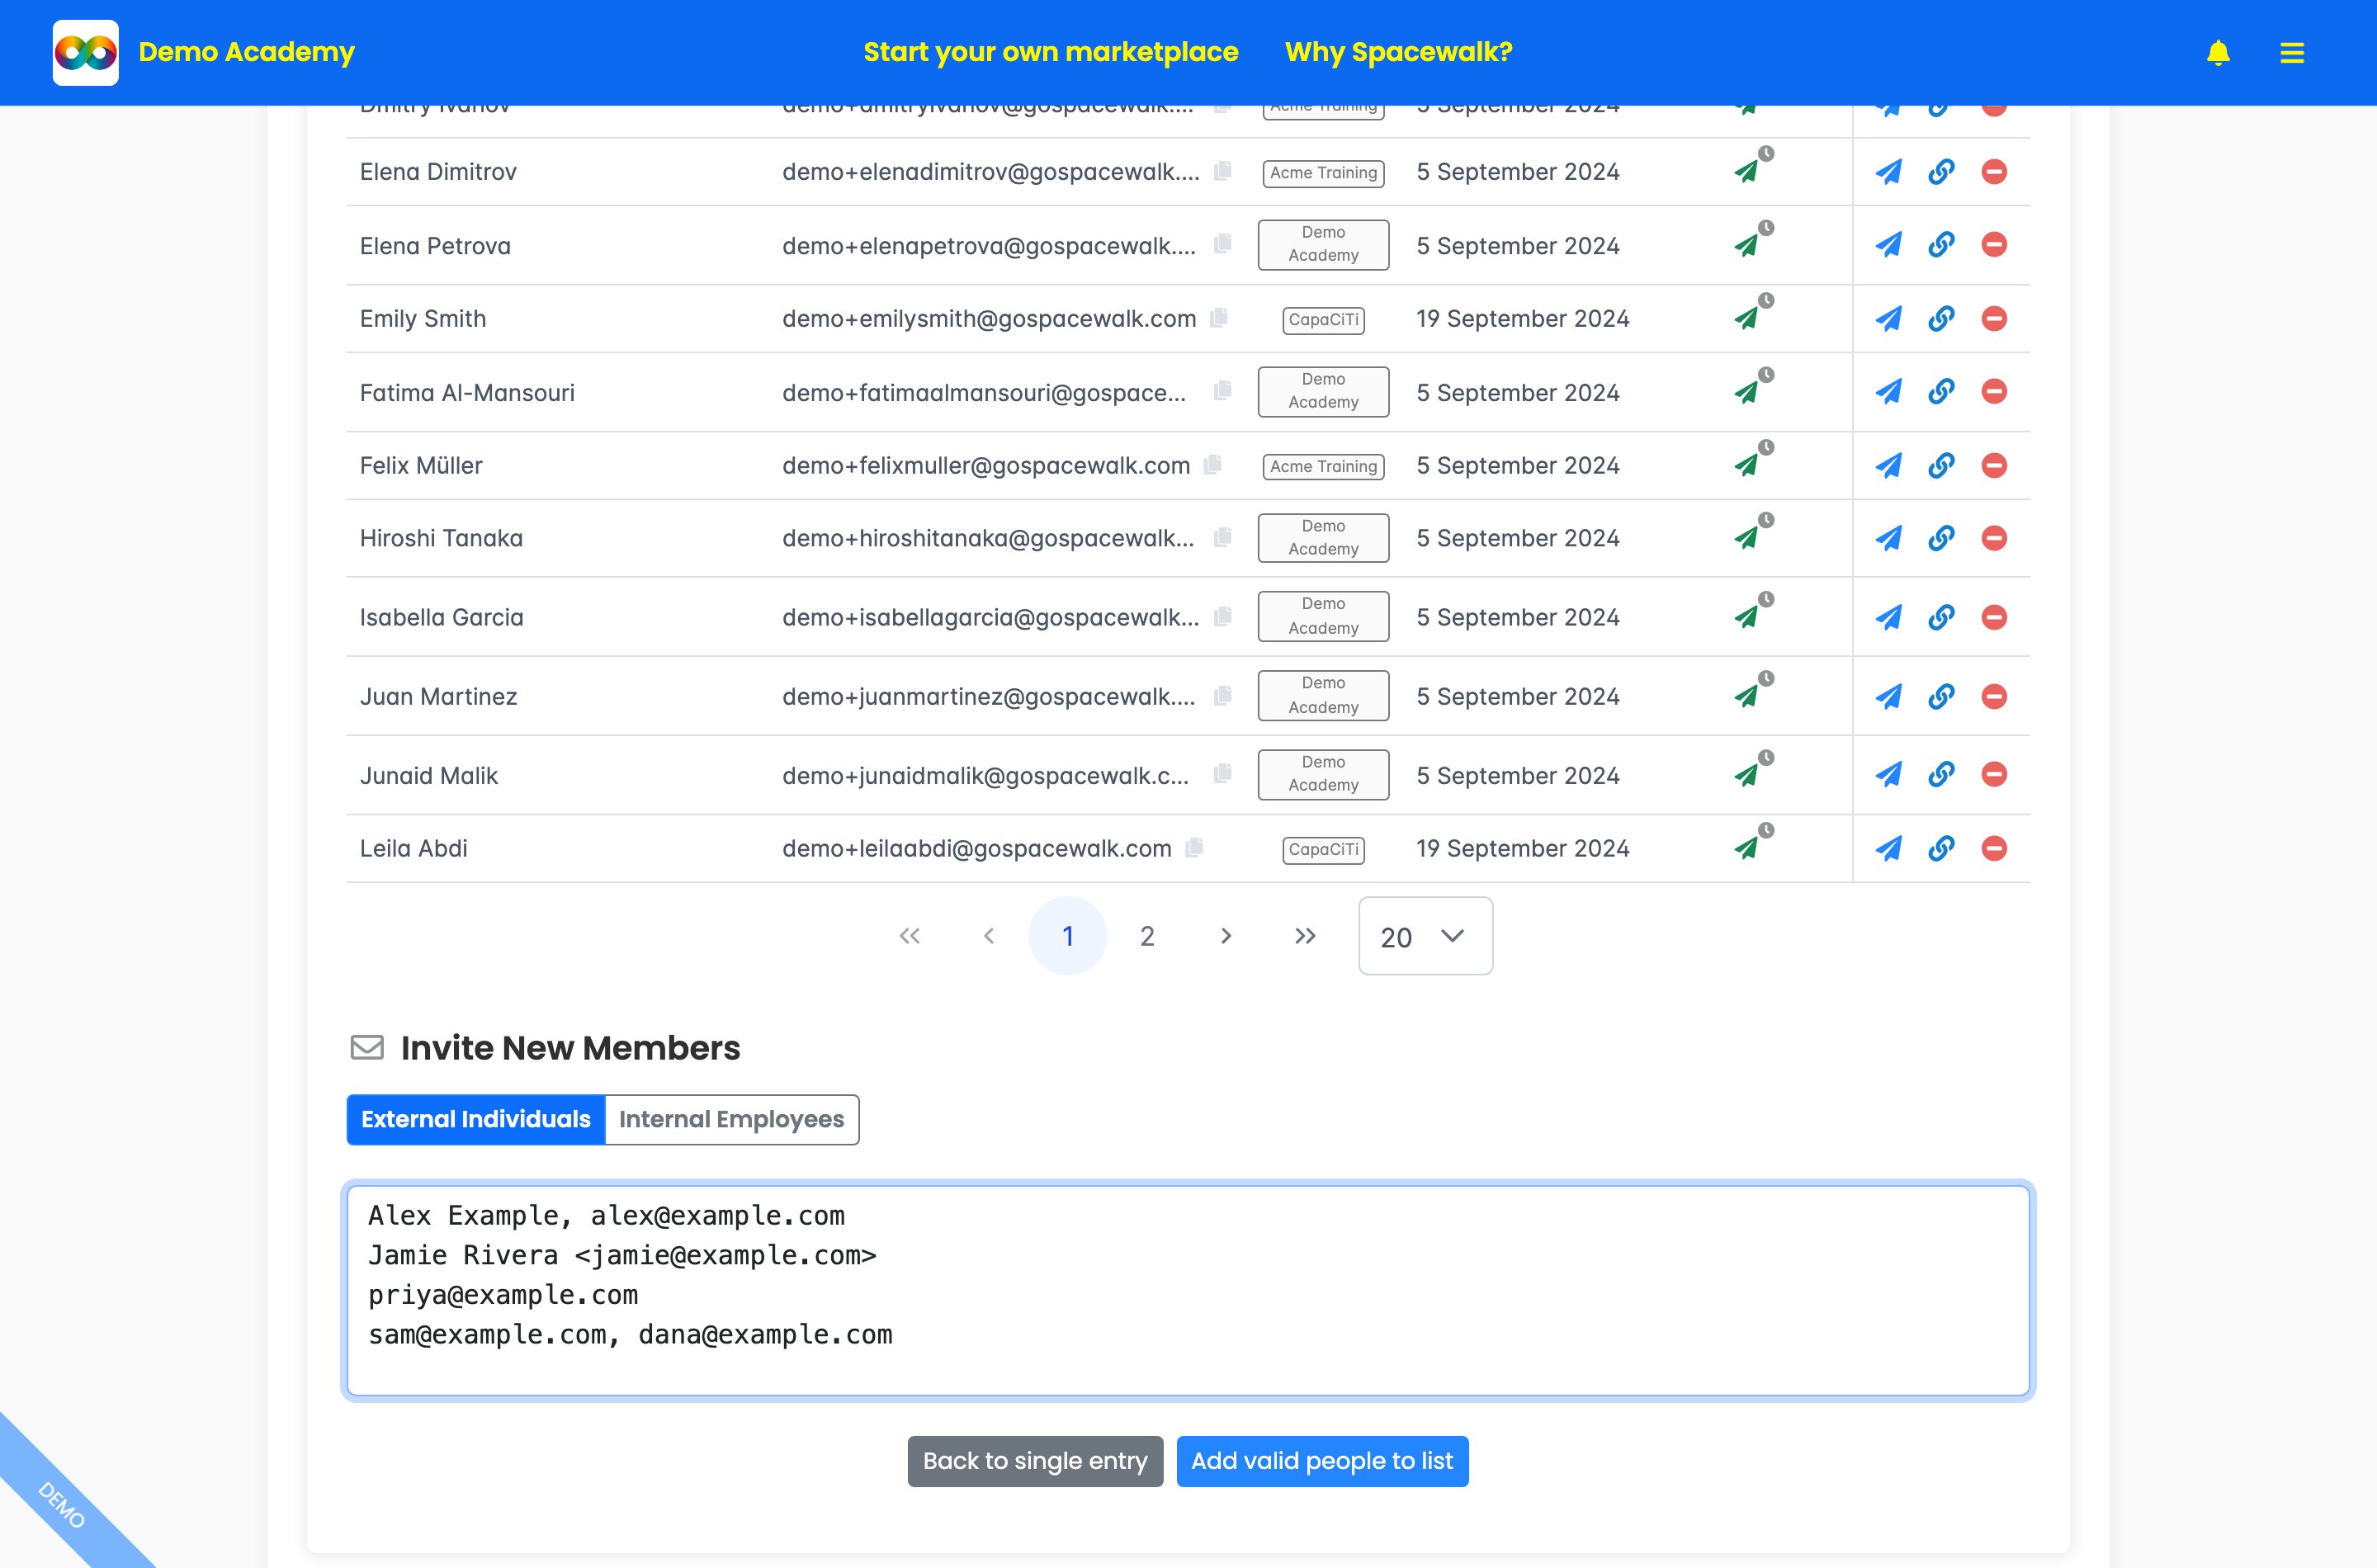
"Invite New Members", then "Paste a list": drop in your whole list in any mix of formats, then press "Add valid people to list" to review before sending.
Invite employers / companies
- Go to "Manage Marketplace", then your companies tab (for example "Companies" or "Employers"), then "Invites".
- Under "Invite Company", search by company name and click to invite if found - or invite them by email if not.
Approve, track and remove members
- "Joined" shows current members, when they joined and when they were last seen.
- "Invites" shows who's been invited, with quick filters like "All" and "Ready to resend"; from each row you can resend or copy an invite link.
- "Requests" shows people waiting for your approval (this is empty when there's nothing pending).
- To remove someone, use the red remove icon in their row and confirm. The same pattern works for companies and for individuals.
The number badges on the members tabs tell you at a glance how many members and pending invites you have.
4. Make the board look like yours
Name, description and web address
- Go to "Manage Marketplace", then "Overview".
- Edit the "Marketplace name" and "Marketplace Overview" (the short description members read).
- Set your "Personalised URL" (letters and numbers only) - this becomes your board's web address.
- Press "Save".
Logo and images
- Go to "Manage Marketplace", then "Customisation", then "Branding".
- Upload your "Hero Image" and "Logo", and the "Mobile hero / social sharing / login page image".
- Press "Save".
Your header and footer
- Open the menu, then "Manage Company", then "Company", then "Branding", then open the "Header" or "Footer" tab.
- Use the live "Header preview" to see your changes as you make them. Choose your header image, set the "Background colour" and "Text colour" and decide how your name is displayed.
- Press "Add link" to add your own header or footer links (each can be toggled "Enabled" on or off), then press "Save".
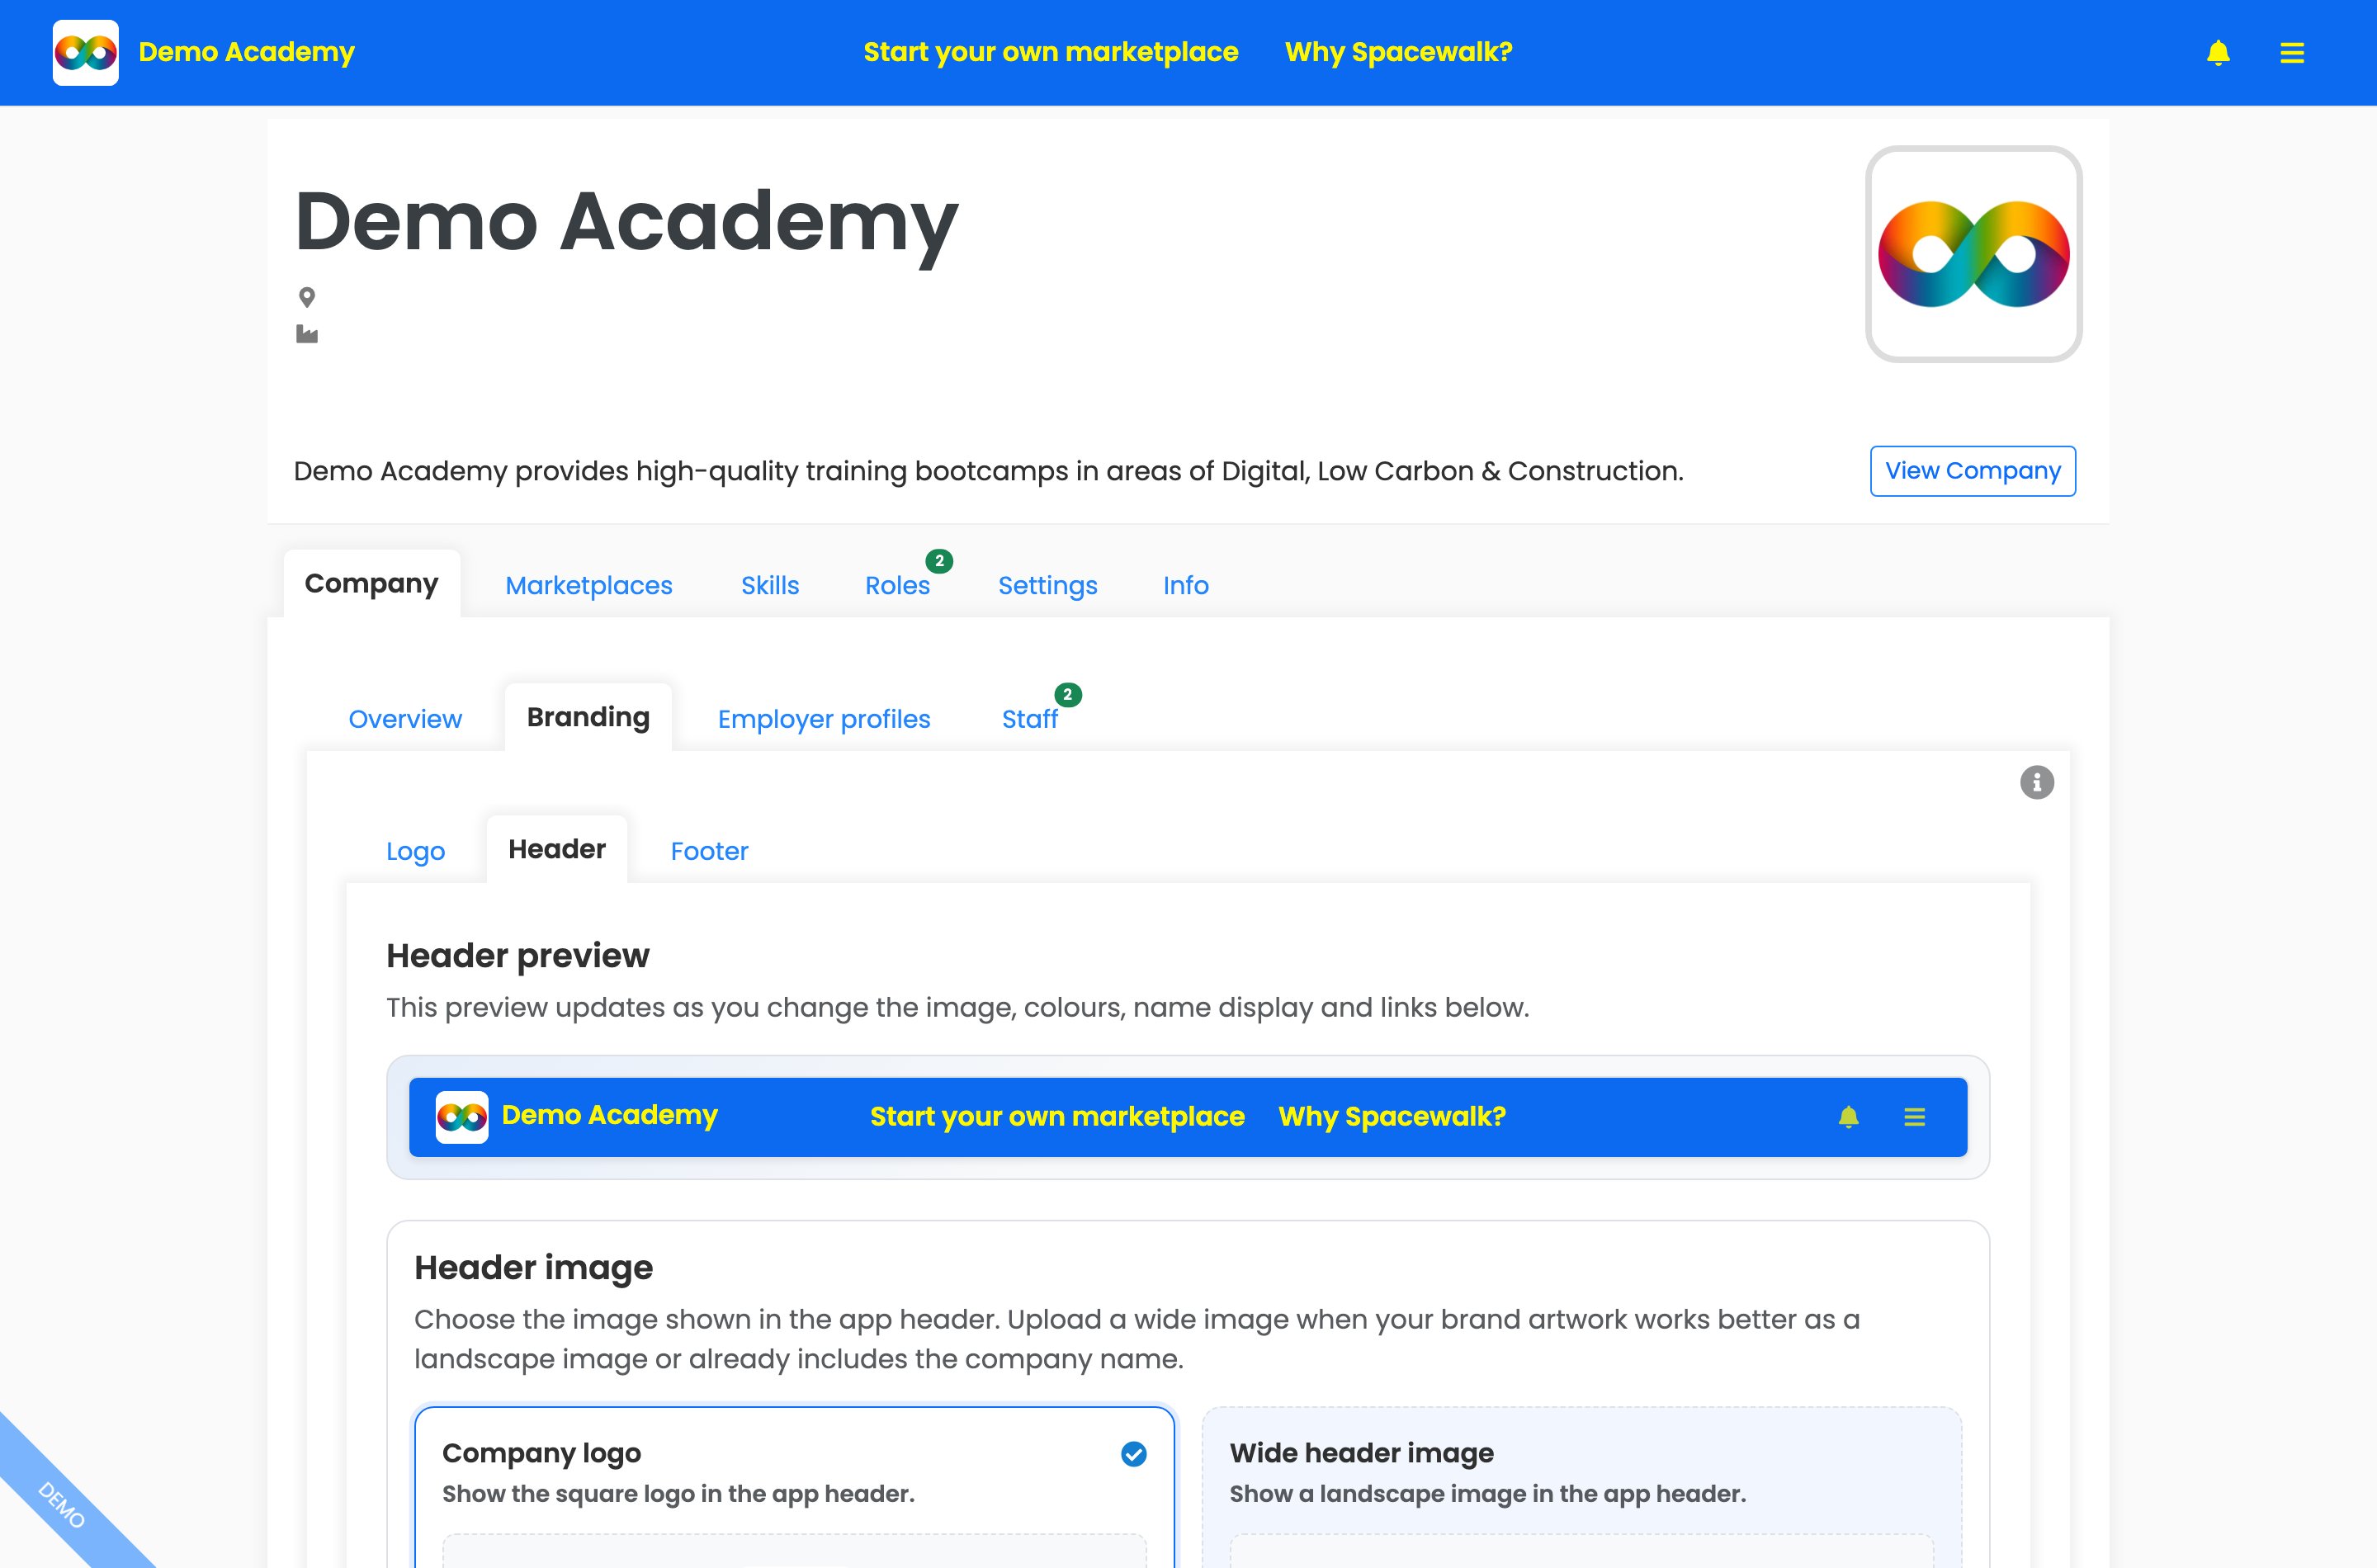
Manage Company, then Company, then Branding, then Header. The live preview updates as you change the image, colours and links.
Use your own words
- Go to "Customisation", then "Terminology".
- Rename "Opportunities", "Companies" and "Individuals" (singular and plural) to match what your community calls them - for example "Jobs", "Employers" and "Job seekers". Your board and its buttons follow suit.
- Press "Save".
Highlight a timely message
- Go to "Customisation", then "Announcement cards", then "Add announcement card".
- Fill in a "Headline", up to two lines of text, an optional "Button label" and "Button URL" and a "Start date" / "End date". Pick your colours and check the live "Preview".
- Toggle it "Enabled" and press "Save".
Announcement cards sit at the top of your board on mobile and on the right on desktop - good for campaigns, deadlines, webinars or links you want members to see first.
Decide what shows on the board
- Go to "Customisation", then "Settings".
- Turn the "Community" features on or off: "Community Chat", "Featured Roles", "New Roles" and "New Members".
- Set the extras you want: "Preview role details in sidebar", "Hide Closed Roles" and (under "Engagement") the Weekly "Job Stream" Opportunities Email.
- Press "Save".
5. Use custom skills for your own talent pool
Roles and member profiles matched against your own approved skills list - useful if you connect roles to your own talent pool (for example tutor companies, internal talent marketplaces or specialised on-demand agencies). Most boards don't need this - the standard skills library covers general hiring. Turn it on only if you want a specialist or restricted skills list that you control.
Turn custom skills on
- Open the menu, then "Manage Company", then "Settings".
- Expand "Advanced" and turn on "Enable custom skills".
- Choose your own wording if you like - set the "Singular terminology" and "Plural terminology" (for example "subject" and "subjects" for a tutoring business).
- Press "Save". A new "Skills" tab appears in Manage Company.
Build your approved list
- Open the "Skills" tab and press "Add skill".
- Give it a "Skill name" and a "Category" (General, Technical, Tool, Domain, Behavioural, Physical, Qualification, Certification or Human language).
- Leave "Use this skill to trigger match email alerts" on if roles tagged with it should notify matching members.
- Optionally add "Tooltip text" - a short description shown when people hover over the skill in search results.
- Press "Add skill".
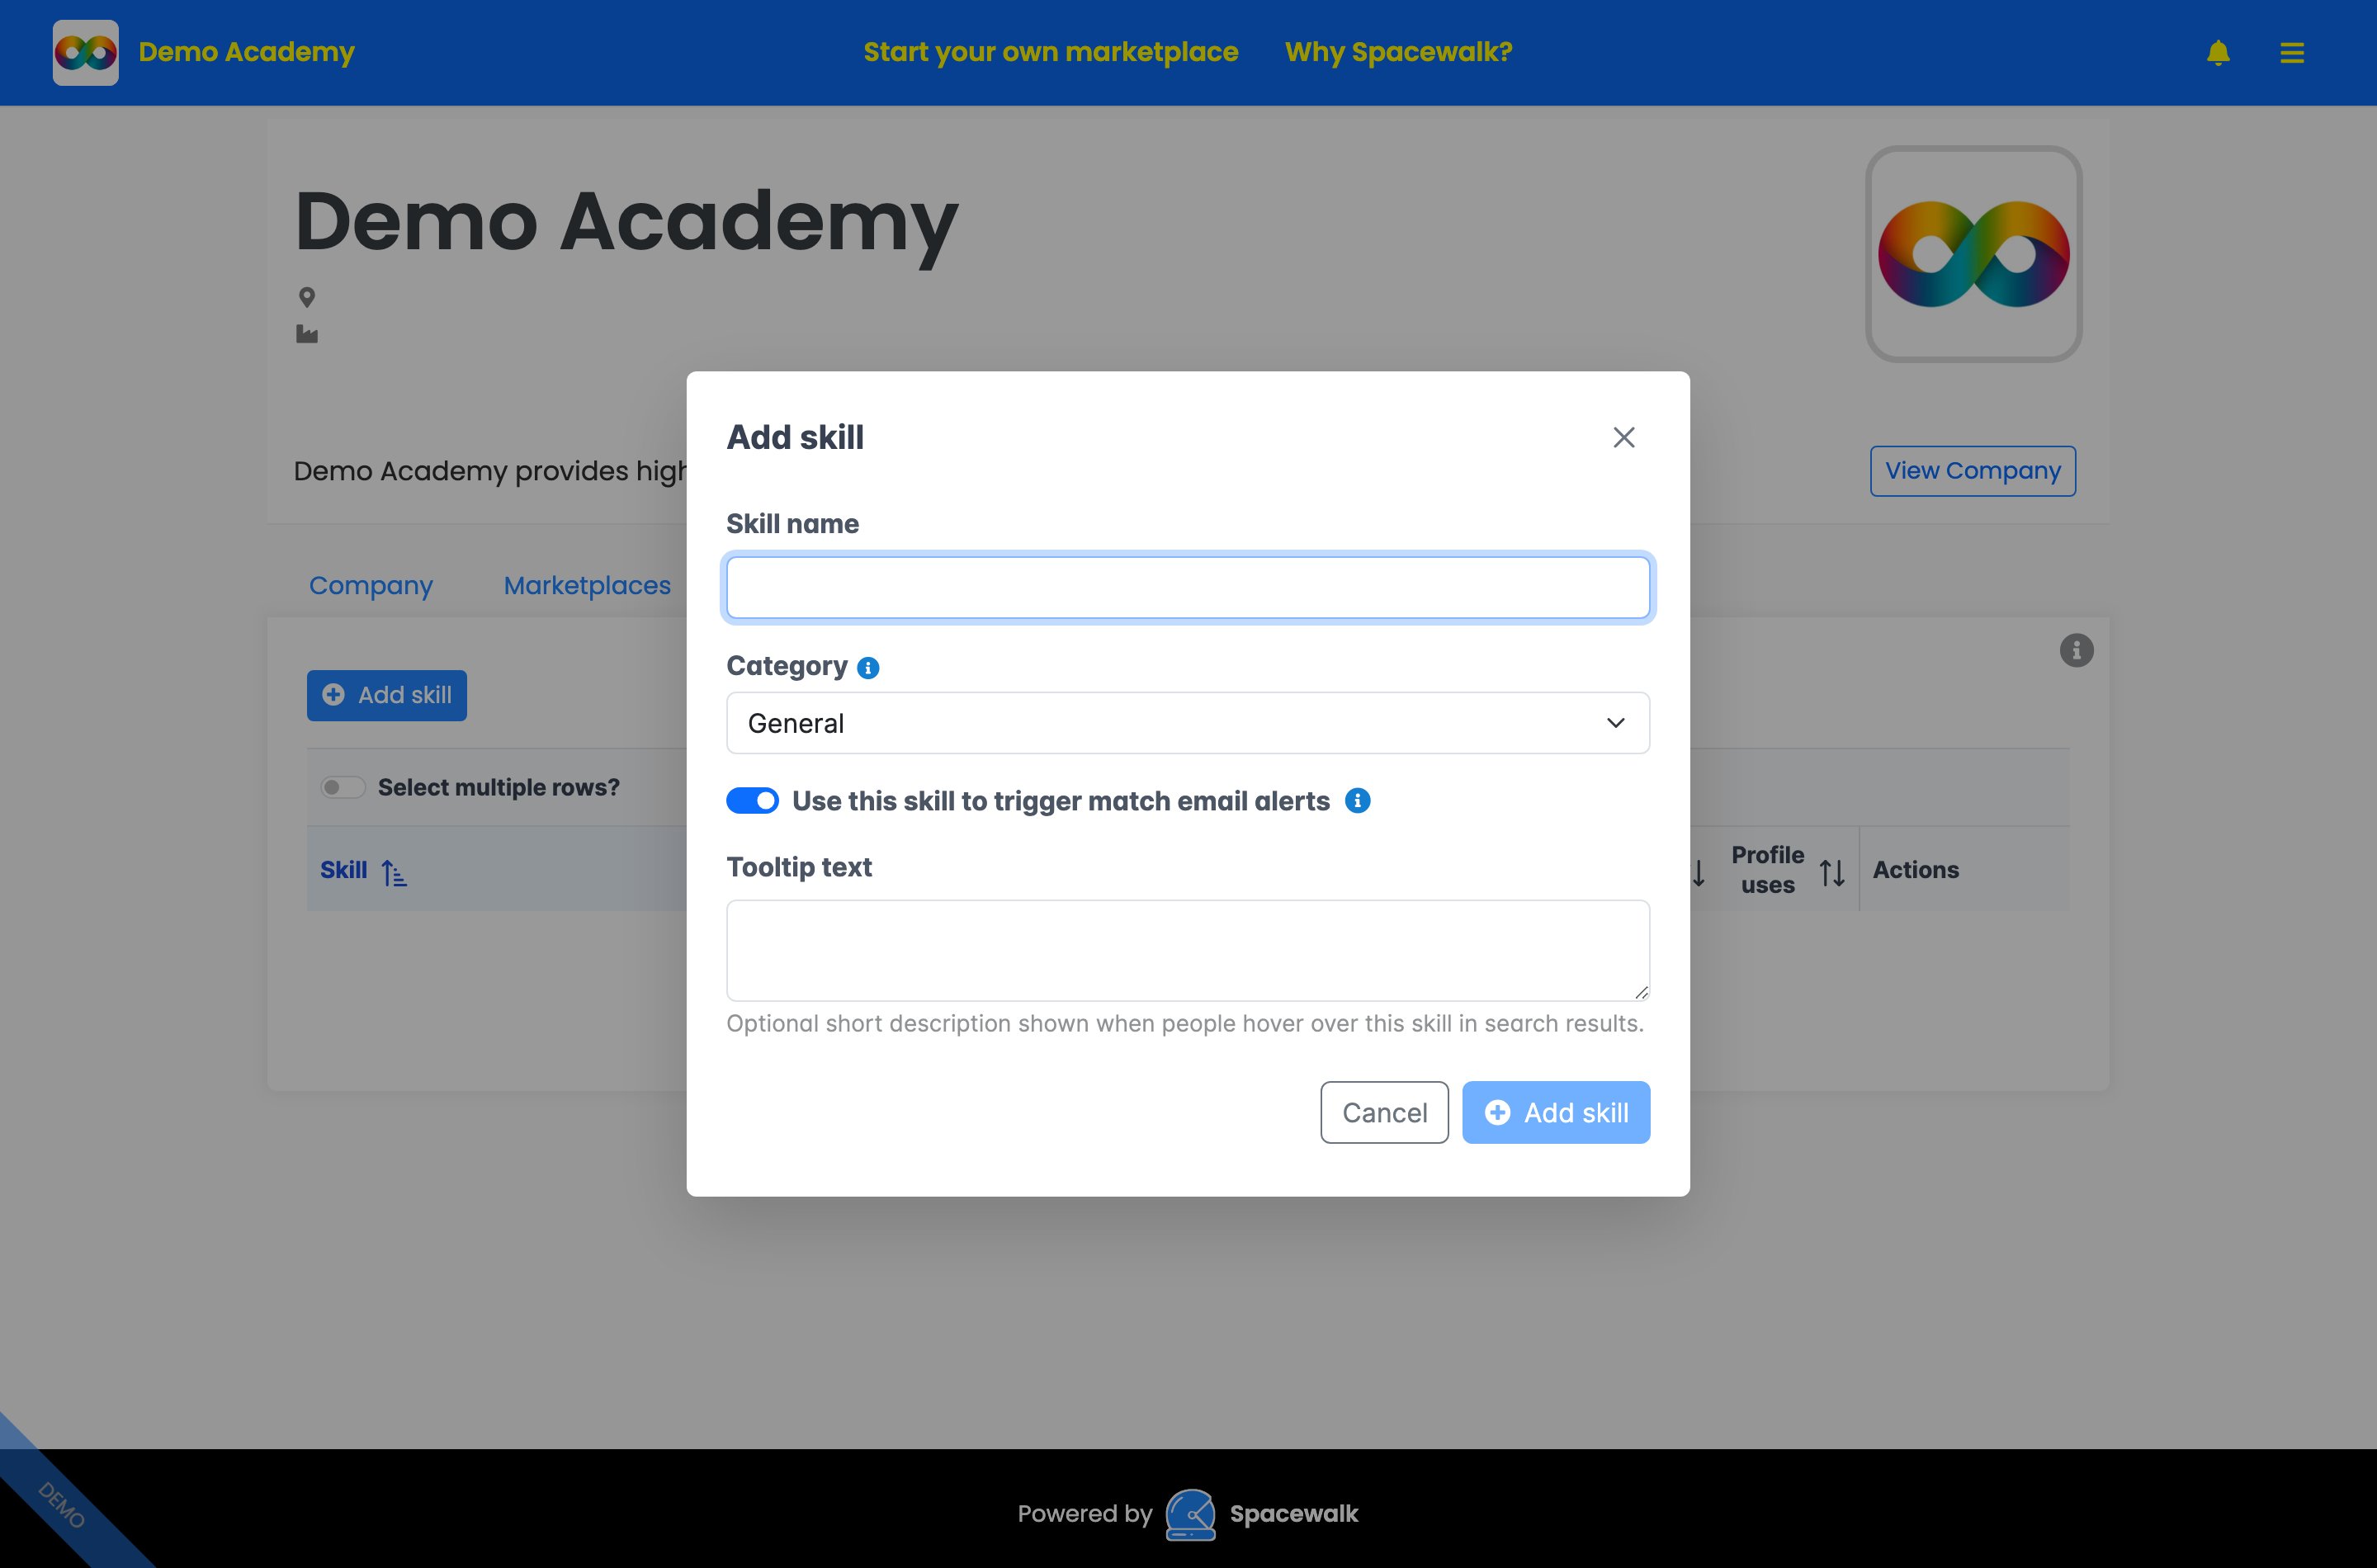
The "Add skill" modal: name the skill, pick a "Category", keep match-email alerts on if you want it to notify members and add optional "Tooltip text".
The Skills table shows where each skill is used - "Role uses" and "Profile uses" - so you can see which skills are doing the work. When posting a role, the "Desired skills" search then draws on your company's own catalogue.
6. Prove the board's value with numbers
A clear, screenshot-ready picture of activity to share with your stakeholders - in under a minute.
- Go to "Manage Marketplace", then "Analytics".
- Open "Roles" to see "Total Roles", "Active", "Closed", "Employers" and "Applications", plus a sortable table of every role. Filter by "Date posted" and toggle "Include archived?".
- Open "Applicants" to see "Applications", "Applicants", "Roles", "Employers", "Interviews" and "Placements".
- Open "Metrics" to see engagement for the "Last 30 days" and "All time": "Total Visits", "Unique Visitors", "Roles Posted", "Role Views" and "Total Applications".
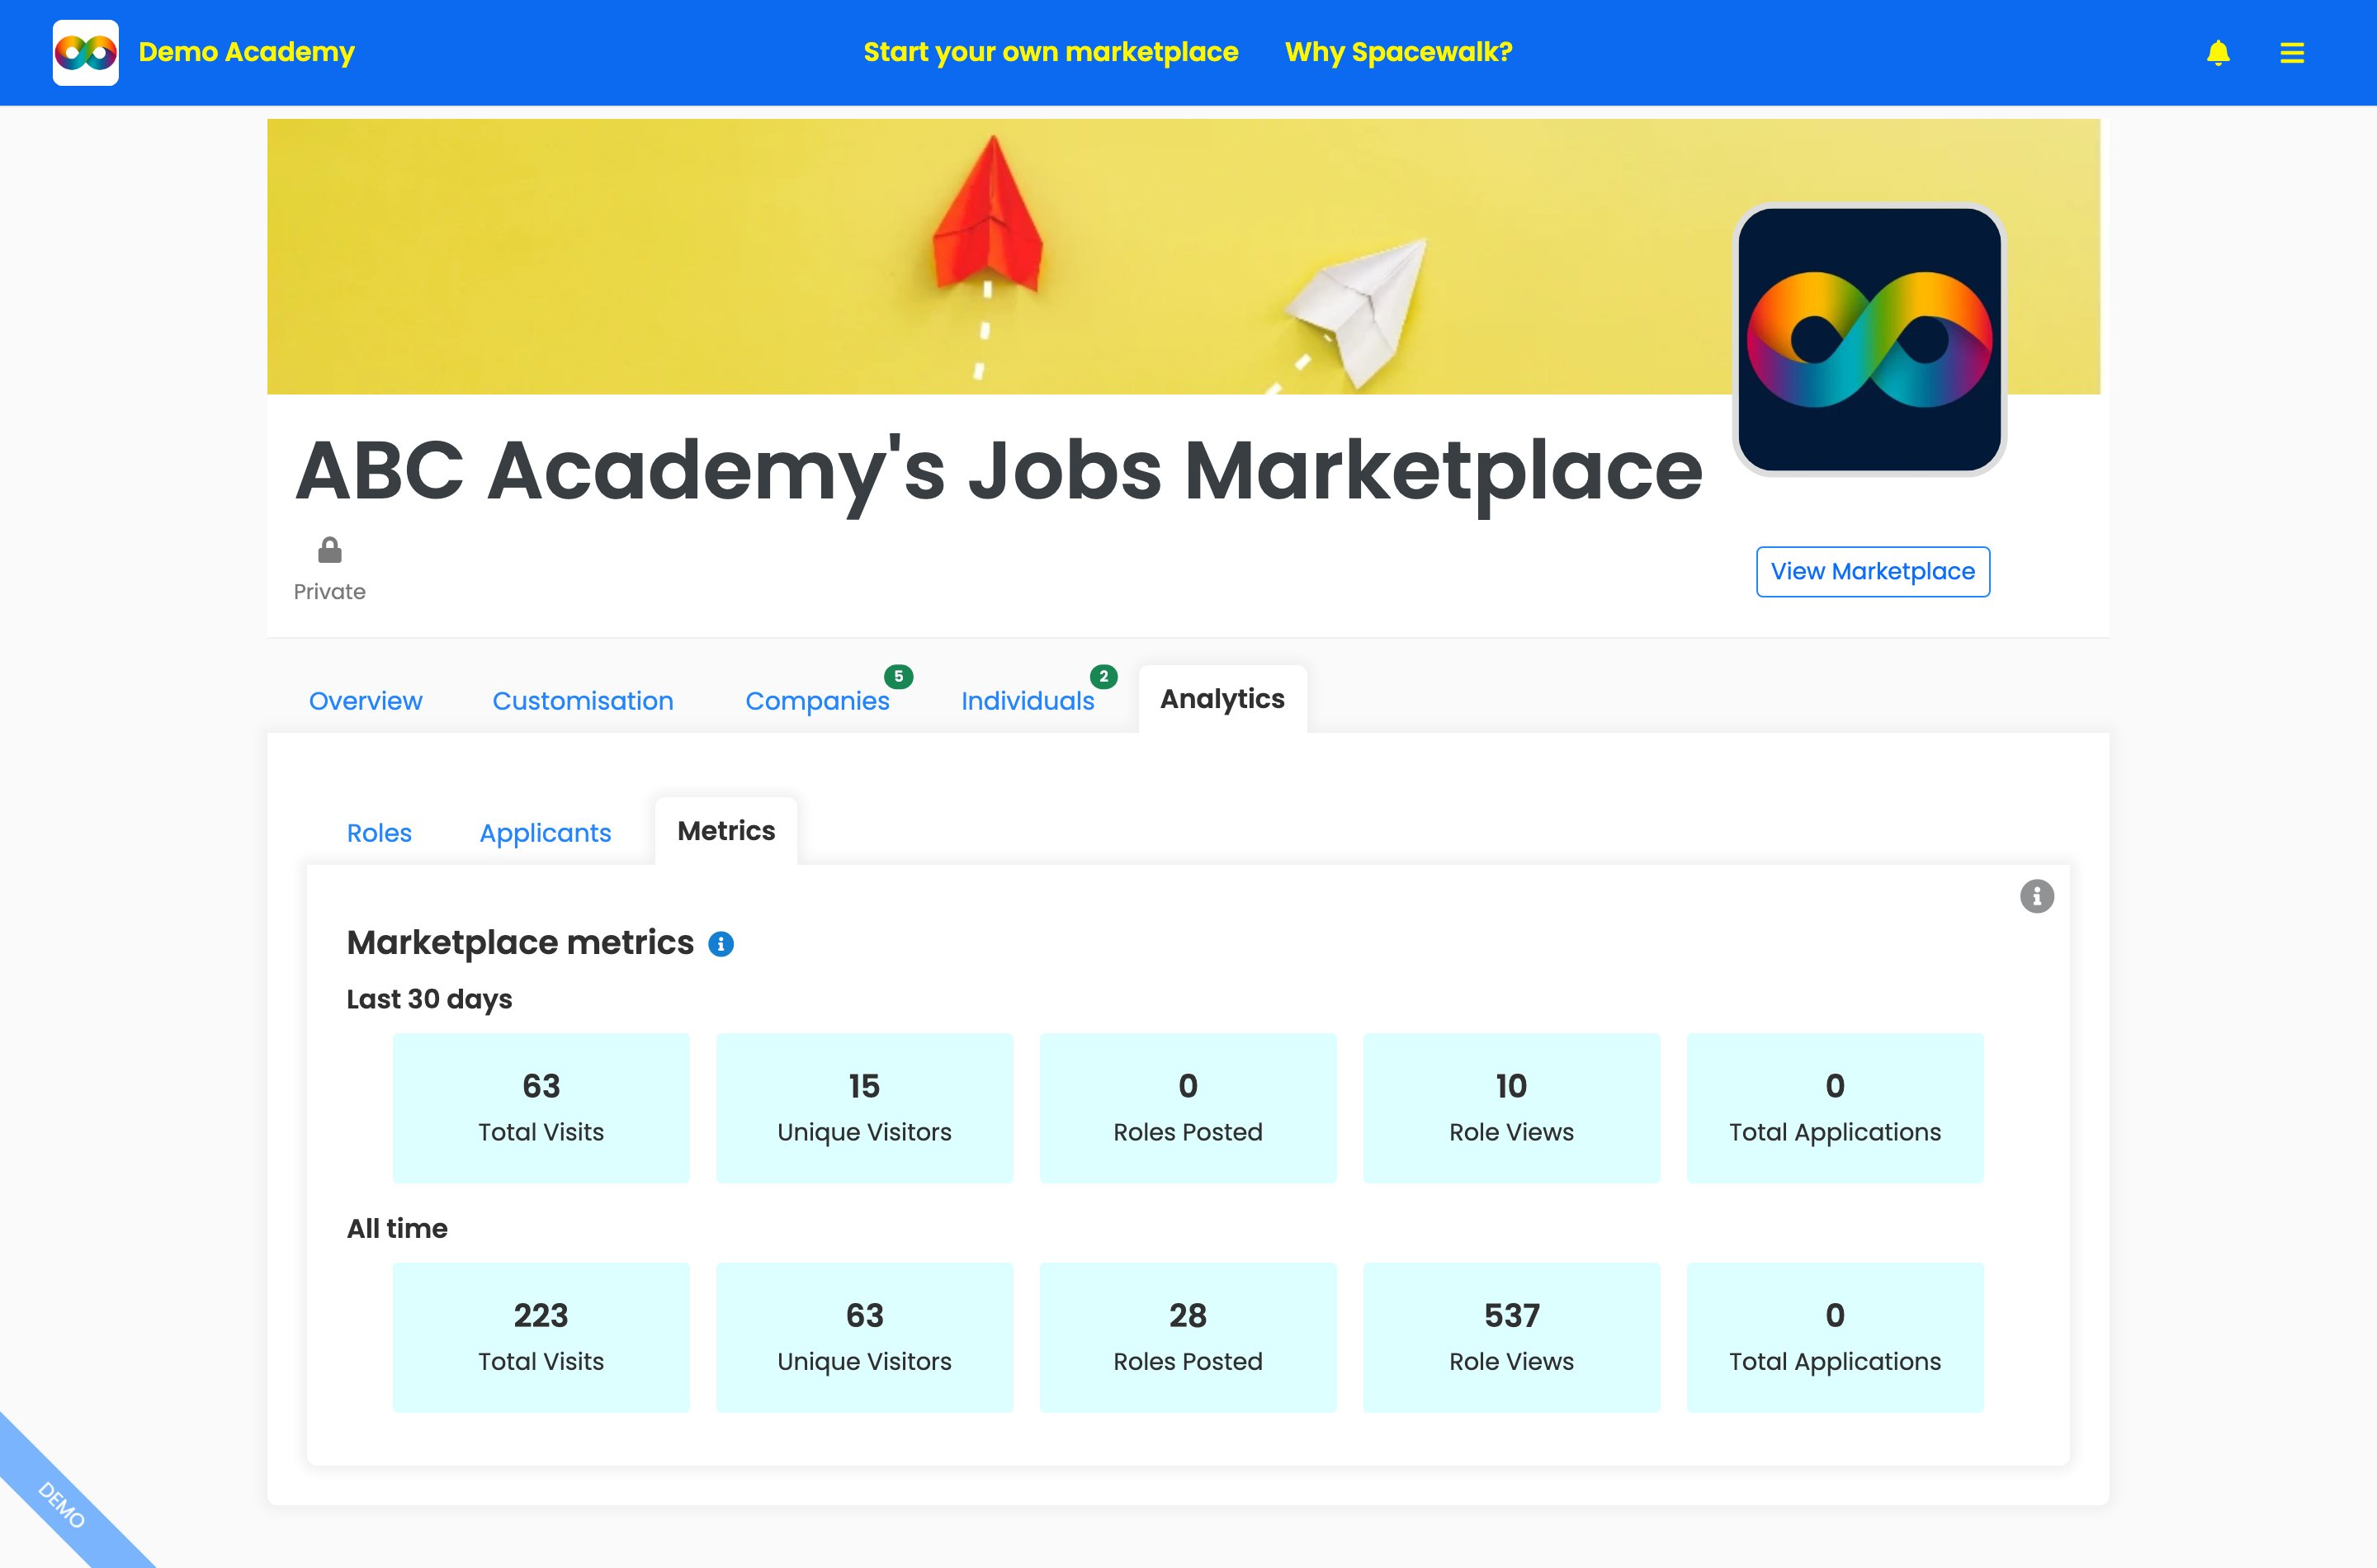
Analytics, then Metrics: engagement for the "Last 30 days" and "All time" - Total Visits, Unique Visitors, Roles Posted, Role Views and Total Applications.
These figures update themselves - so each time a stakeholder asks "is it working?", the answer is already on screen.
7. Get your data out (1-click export)
Your members, roles and employer profiles are yours to take - downloadable any time.
- Members: go to your members tabs in "Manage Marketplace" and press "Export" (or "Export (All rows)").
- Roles: in "Analytics", then "Roles" press "Export"; or in "Manage Company", then "Roles" press "Export (All rows)".
- Employer profiles: in "Manage Company", then "Company", then "Employer profiles" press "Export".
Exports download as a spreadsheet file (CSV), ready to open or share. Nothing leaves your account unless you choose to download it.
8. Add teammates and run more than one board
Add admins (unlimited, free)
- Open the menu, then "Manage Company", then "Company", then "Staff", then "Invite Admins".
- Paste admin email addresses (up to 30 at a time) and press "Send admin invites".
Admins can manage your company, post opportunities, review applications and join or start boards. You can add as many as you like at no extra charge.
See and switch between your boards
- Open the menu and use the "Manage marketplaces" links to jump straight into any board's control room.
- Or go to "Manage Company", then "Marketplaces" to see all your boards, who hosts each, its access level, and manage or duplicate it.
Keep your company profile current
- "Manage Company", then "Company": "Overview" (name, description, country, sector and website), "Branding" (your logo, header and footer), "Employer profiles" (the brands you post for) and "Staff" (your admin team).
- "Manage Company", then "Settings": default role access and sharing controls, plus "Advanced" options like custom skills.
- "Manage Company", then "Roles": every role your company has posted, with "Add Opportunity" and status filters ("Available", "Closed", "Archived", "All").
Stuck on anything? Press "Help" on your board or contact your Spacewalk team - including any change to your automatic job stream.
